**Before following these steps, make sure to stop your server first. This is to avoiding breaking anything on your server while you edit.**
**Step 1:** Head to your game panel and look for your **File** **icon** on the left hand side. // Photos to be added on AH 2.0 **Step 2:** When you are in you files, scroll down until you see a file named: **serverconfig.xml** // Photos to be added on AH 2.0 Step 3:** Open the file and look for the line that says: **<property name="ServerDescription" value="A 7 Days to Die server"/> .** When you have found this line, you can add your own custom Server Description in the Value area. If you want to add colour to your text, go to **Step3a:**Before: **<property name="ServerDescription" value="A 7 Days to Die server"/>** After: **<property name="ServerDescription" value="Alien Host New PVP Server!"/>**
**Step3a:** To add a colour to your text, head to this website and pick a HEX Colour. [Google Colour Picker](https://g.co/kgs/XfK2L9H) 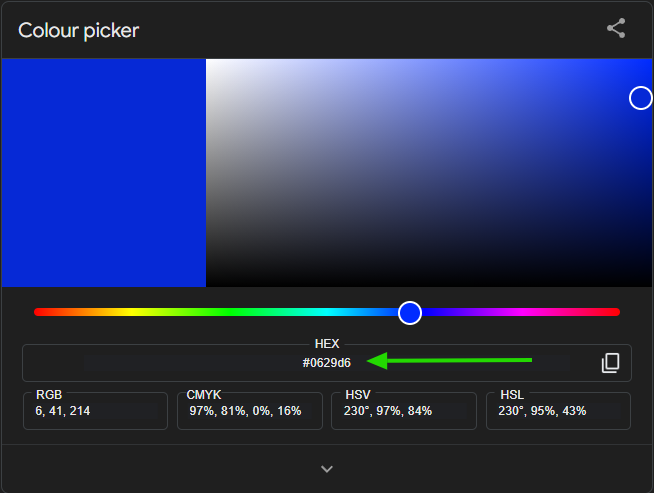 After you pick your colour go to the box and paste it where you want the colour to show. However, make sure you do \[\] for the colour to work.Before: **<property name="ServerDescription" value="Alien Host New PVP Server!"/>** After: **<property name="ServerDescription" value="\[0629d6\]Alien Host New PVP Server!"/> When you add you colour just make sure to remove the # Dont do this: \[#0629d6\] Do this: \[0629d6\] In the photo below u can see the Server Description has changed to blue.**
 //Photos to be added on AH 2.0**Make sure to save before exiting the file**.
**After Completing these steps, you can now go and start you server.**
//Photos to be added on AH 2.0 # Change the Difficulty**Before following these steps, make sure to stop your server first. This is to avoiding breaking anything on your server while you edit.**
**Step 1:** Head to your game panel and look for your **Startup** **icon** on the left hand side. // Photos to be added on AH 2.0 **Step 2:** In the Startup area, look for the box that says: GAME DIFFICULTY Here you can change your Difficulty settings Between 0 to 5.In the photo Below, it will show case what each difficulty stands for and how much it will affect you in game.
**After Completing these steps, you can now go and start you server.**
// Photos to be added on AH 2.0 # Change Server Visibility**Before following these steps, make sure to stop your server first. This is to avoiding breaking anything on your server while you edit.**
**Step 1:** Head to your game panel and look for your **File** **icon** on the left hand side. // Photos to be added on AH 2.0 **Step 2:** When you are in you files, scroll down until you see a file named: **serverconfig.xml** // Photos to be added on AH 2.0 Step 3:** Open the file and look for the line that says: **<property name="ServerVisibility" value="2"/> .** When you have found this line, you just need to edit the number in the Value area.Before: **<property name="ServerVisibility" value="2"/> <--- Server is Visible to the public.** After: **<property name="ServerVisibility" value="1"/> <--- Server is only Visible to friends.** There are 3 settings for Server Visibility ranging from 0 to 2. Each number has its own setting: **0 = Not Listed (Server will not show to anyone. Can only connect with IP Address)** **1 = Only shown to friends (Server will become visible to you friends if a player join the server with the IP Address)** **2 = Public (Server is visible to the public)**
//Photos to be added on AH 2.0**Make sure to save before exiting the file**.
**After Completing these steps, you can now go and start you server.**
//Photos to be added on AH 2.0 # Change the Map # Change Server Name**Before following these steps, make sure to stop your server first. This is to avoiding breaking anything on your server while you edit.**
**Step 1:** Head to your game panel and look for your **File** **icon** on the left hand side. // Photos to be added on AH 2.0 **Step 2:** When you are in you files, scroll down until you see a file named: **serverconfig.xml** // Photos to be added on AH 2.0 Step 3:** Open the file and look for the line that says: **<property name="ServerName" value="My Game Host"/> .** When you have found this line, you just need to add you new server name in the Value area.Before: **<property name="ServerName" value="My Game Host"/>** After: **<property name="ServerName" value="AlienHost"/>**
//Photos to be added on AH 2.0**Make sure to save before exiting the file**.
**After Completing these steps, you can now go and start you server.**
//Photos to be added on AH 2.0 # Add Server Password**Before following these steps, make sure to stop your server first. This is to avoiding breaking anything on your server while you edit.**
**Step 1:** Head to your game panel and look for your **File** **icon** on the left hand side. // Photos to be added on AH 2.0 **Step 2:** When you are in you files, scroll down until you see a file named: **serverconfig.xml** // Photos to be added on AH 2.0 Step 3:** Open the file and look for the line that says: **<property name="ServerPassword" value=""/> .** When you have found this line, you just need to add a password in the Value area.Before: **<property name="ServerPassword" value=""/>** After: **<property name="ServerPassword" value="Thisismynewpassword"/>**
//Photos to be added on AH 2.0**Make sure to save before exiting the file**.
**After Completing these steps, you can now go and start you server.**
//Photos to be added on AH 2.0 # Change Server Region**Before following these steps, make sure to stop your server first. This is to avoiding breaking anything on your server while you edit.**
**Step 1:** Head to your game panel and look for your **File** **icon** on the left hand side. // Photos to be added on AH 2.0 **Step 2:** When you are in you files, scroll down until you see a file named: **serverconfig.xml** // Photos to be added on AH 2.0 Step 3:** Open the file and look for the line that says: **<property name="Region" value="NorthAmericaEast" /> .** When you have found this line, you just need to add you server region in the Value area. **To find your Region look at Step 3a:**Before: **<property name="Region" value="NorthAmericaEast" />** After: **<property name="Region" value="Oceania" />**
//Photos to be added on AH 2.0 **Step 3a:** To find your region, head to the **Startup icon** on the left hand side. And, look for **Debug Information Box.** In the box, you should see you host location on the Node line. When you have found what your node name is, head to [Alien Host Uptime](https://uptime.alienhost.net/status/nodes "Alien Host Uptime") Then look for your Node region. When you have found it, then you can head back to your file and change your region to the correct region.The Following Regions you can use: **NorthAmericaEast, NorthAmericaWest, CentralAmerica, SouthAmerica, Europe, Russia, Asia, MiddleEast, Africa, Oceania.**
**If you are on an Australia Node, your region will be set as Oceania.**
//Photos to be added on AH 2.0**Make sure to save before exiting the file**.
**After Completing these steps, you can now go and start you server.**
//Photos to be added on AH 2.0 # Change Player Count**Before following these steps, make sure to stop your server first. This is to avoiding breaking anything on your server while you edit.**
**Step 1:** Head to your game panel and look for your **Startup** **icon** on the left hand side. // Photos to be added on AH 2.0 **Step 2:** In the Startup area, look for the box that says: MAX PLAYERS Here you can change your player count to any number.HOWEVER, do not do more the 29 players. The reason for this, is that you server will very likely start breaking **game save file** and **player save file**. You won't be able to fix this, if you start getting corrupted files. So to be on the safe side do **29 and lower.**
// Photos to be added on AH 2.0**Do not edit your serverconfig.xml for MaxPlayers. Your Startup will keep overriding your player count if you do.**
**After Completing these steps, you can now go and start you server.**
//Photos to be added on AH 2.0 # Connect to your Server # Change PvP Settings**Before following these steps, make sure to stop your server first. This is to avoiding breaking anything on your server while you edit.**
**Step 1:** Head to your game panel and look for your **File** **icon** on the left hand side. // Photos to be added on AH 2.0 **Step 2:** When you are in you files, scroll down until you see a file named: **serverconfig.xml** // Photos to be added on AH 2.0 Step 3:** Open the file and look for the line that says: **<property name="PlayerKillingMode" value="3" /> .** When you have found this line, you just need to change the number in the Value area.Before: **<property name="PlayerKillingMode" value="3" /> <--- Everyone can kill each other** After: **<property name="PlayerKillingMode" value="0" /> <--- No one can kill each other** There are 3 settings for Server Visibility ranging from 0 to 2. Each number has its own setting: **0 = No Killing: Players cannot damage one another under any circumstances.** **1 = Killing Allies Only: Players can only damage each other if both agree to it by adding each other to their Allies list using the in game players menu.** **2 = Killing Strangers Only: Players can damage each other UNLESS they are Allies.** **3 = Killing Everyone: Players can damage everyone, regardless of Allied status**
//Photos to be added on AH 2.0**Make sure to save before exiting the file**.
**After Completing these steps, you can now go and start you server.**
//Photos to be added on AH 2.0 # Fully Reset your Server**What you are about to do is fully reset your server. This mean that your files will get deleted in the process. Before doing this stage, please make sure you have created a backup save in case anything goes wrong. Will explain how to do a backup before proceeding. If you want to skip this step go to straight to (How to Fully Reset your server) Below the Backup.**
**How to Create a Backup:****Before creating a backup, make sure to stop your server first.**
1\. Head to your server panel and click on your game. // Photos to be added on AH 2.0 2\. Go and find the **Backup Box** on the left hand side. // Photos to be added on AH 2.0 3\. Then Click on **Create Backup**.You should see a a few setting after clicking on Create Backup: **BACKUP NAME: (Create Name for your Backup file) IGNORED FILES & DIRECTORIES: (Can pick which files you don't want deleted) LOCKED: (Locks the backup so u don't accidentally delete it.) START BACKUP: (Starts creating backup)**
4\. After you start making your backup, please wait for it to be done. This can take any where between a **few seconds to a few hours** depending on how big your file size is. **To know how it's done, you should see 3 dots next to your backup.** This mean you backup is done and you can restore it at any time. // Photos to be added on AH 2.0With this you can now procced with wiping your server.
**How to Fully Reset your server:**Before resetting your server, make sure to stop your server first.
**Step 1:** Go and find your File box on the left hand side. // Photos to be added on AH 2.0 **Step 2:** Go to the top of your file and you should see a small box next to **/home/ container** . Click on the box and click **Delete** at the bottom of your screen. // Photos to be added on AH 2.0 **Step 3:** After you have wiped your files, head over to the **Settings icon** on the left hand. You should see a Box named **Reinstall Server. // Photos to be added on AH 2.0 Step 4:** Click on the box and click **"Yes, reinstall server"**. After you have done this, it should take a few minutes wipe everything and give you a fresh reinstall. // Photos to be added on AH 2.0**After doing all these steps, you have successfully wiped your server and created a fresh new start.**
# Enable or Disable Anti-Cheats**Before following these steps, make sure to stop your server first. This is to avoiding breaking anything on your server while you edit.**
**Step 1:** Head to your game panel and look for your **File** **icon** on the left hand side. // Photos to be added on AH 2.0 **Step 2:** When you are in you files, scroll down until you see a file named: **serverconfig.xml** // Photos to be added on AH 2.0 Step 3:** Open the file and look for the line that says: **<property name="EACEnabled" value="true"/> .** When you have found this line, you just need to change it to either **false** or **true** in the Value area.Before: **<property name="EACEnabled" value="true"/> <--- Anti-Cheat is On** After: **<property name="EACEnabled" value="false"/> <--- Anti-Cheat is off**
**If you disable Server Anti-Cheat, you are exposing your server to potential Hackers.**
Make sure to save before exiting the file.
// Photos to be added on AH 2.0**After Completing these steps, you can now go and start you server.**
//Photos to be added on AH 2.0 # Add a URL**Before following these steps, make sure to stop your server first. This is to avoiding breaking anything on your server while you edit.**
**Step 1:** Head to your game panel and look for your **File** **icon** on the left hand side. // Photos to be added on AH 2.0 **Step 2:** When you are in you files, scroll down until you see a file named: **serverconfig.xml** // Photos to be added on AH 2.0 Step 3:** Open the file and look for the line that says: **<property name="ServerWebsiteURL" value=""/>.** When you have found this line, you can add any URL link in the Value area.Before: **<property name="ServerWebsiteURL" value=""/>** After: **<property name="ServerWebsiteURL" value="https://discord.com/invite/tFEeSHr8sS"/> You can add any type of URL such as: Discord and Websites**
//Photos to be added on AH 2.0**Make sure to save before exiting the file**.
**After Completing these steps, you can now go and start you server.**
//Photos to be added on AH 2.0 # Setup Twitch Integration # Modify Server XP # Kick or Ban players # Reset Player data