Minecraft Guides
- NuVotifier + VotingPlugin
- Geyser + Floodgate
- Simple Voice Chat
- Chunky
- Where do I get the velocity.yml?
- FreedomChat
- Delete Player Data
- How To Admin
- Files and Commands - Vanilla
- Essential plugins for your server - Paper
- Disable the Nether and The End
- Network Protocol Error
- Server not starting properly
- Why use External Databases over Local Databases
- Plan
- Dynmap
- Installation and usage
- Changing Storage Type (Optimization)
- Changing the resolution of the map (Optimization)
- Client
NuVotifier + VotingPlugin
Standalone (Bukkit/Spigot/Paper etc...)
Make sure you have opened a port first if didn't or don't know how to, here a tutorial
1. Start
Get started by logging into the panel here
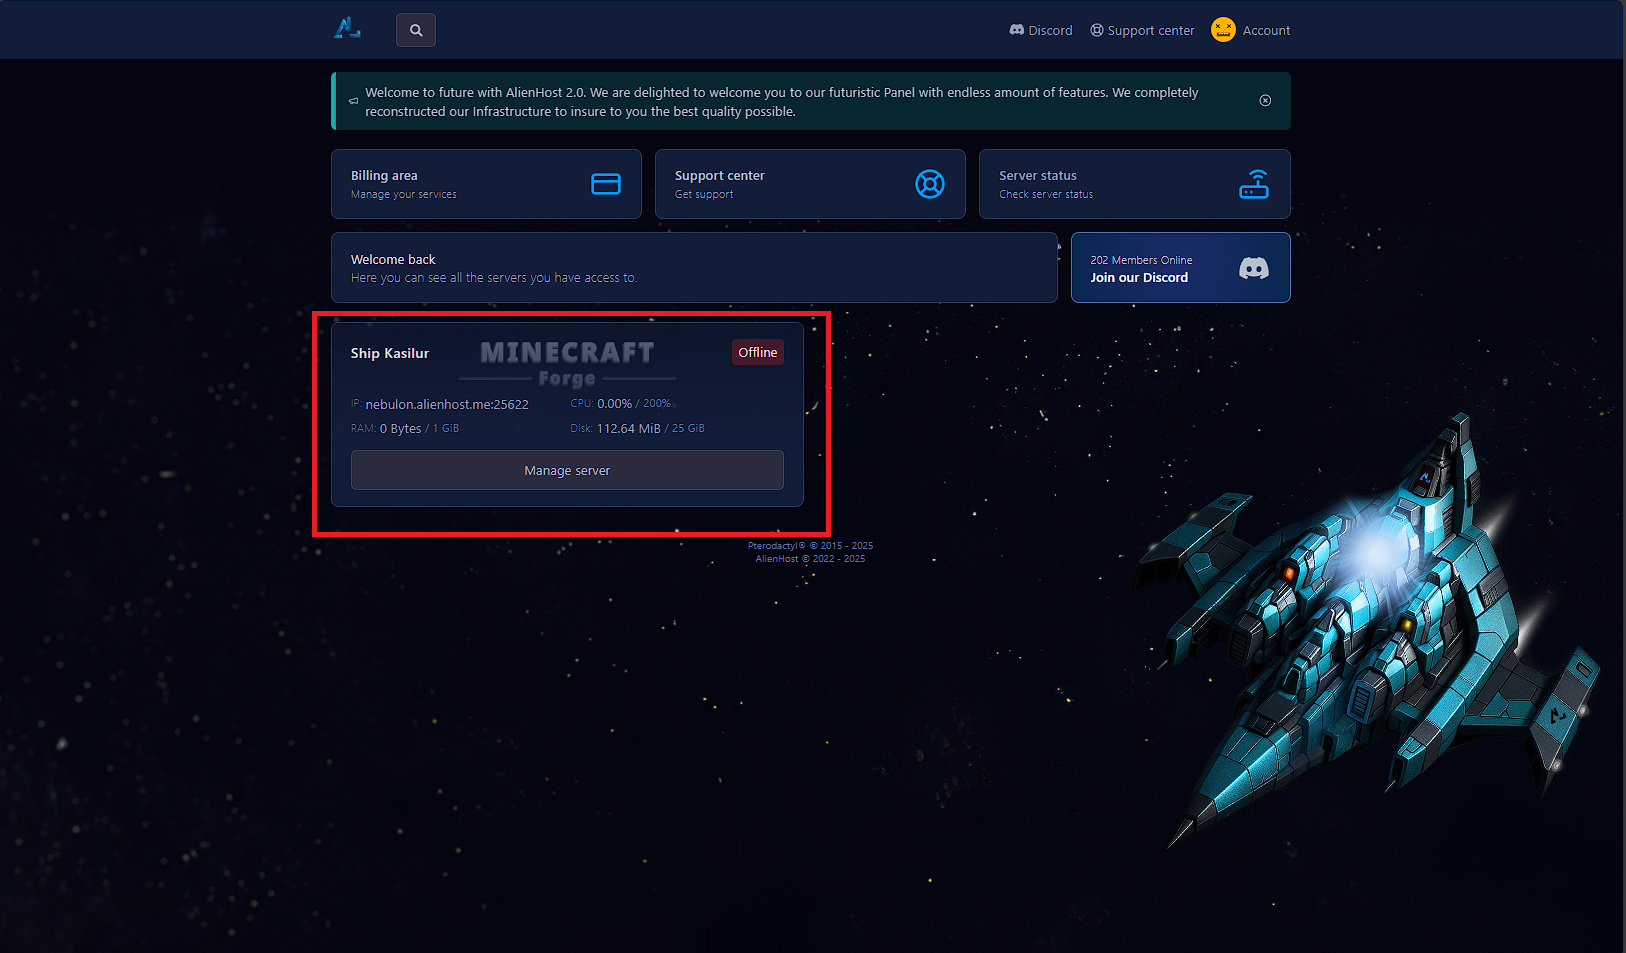
2. Panel
After you log into your account (or if you're already logged in), click on the server where you want to enable voting.
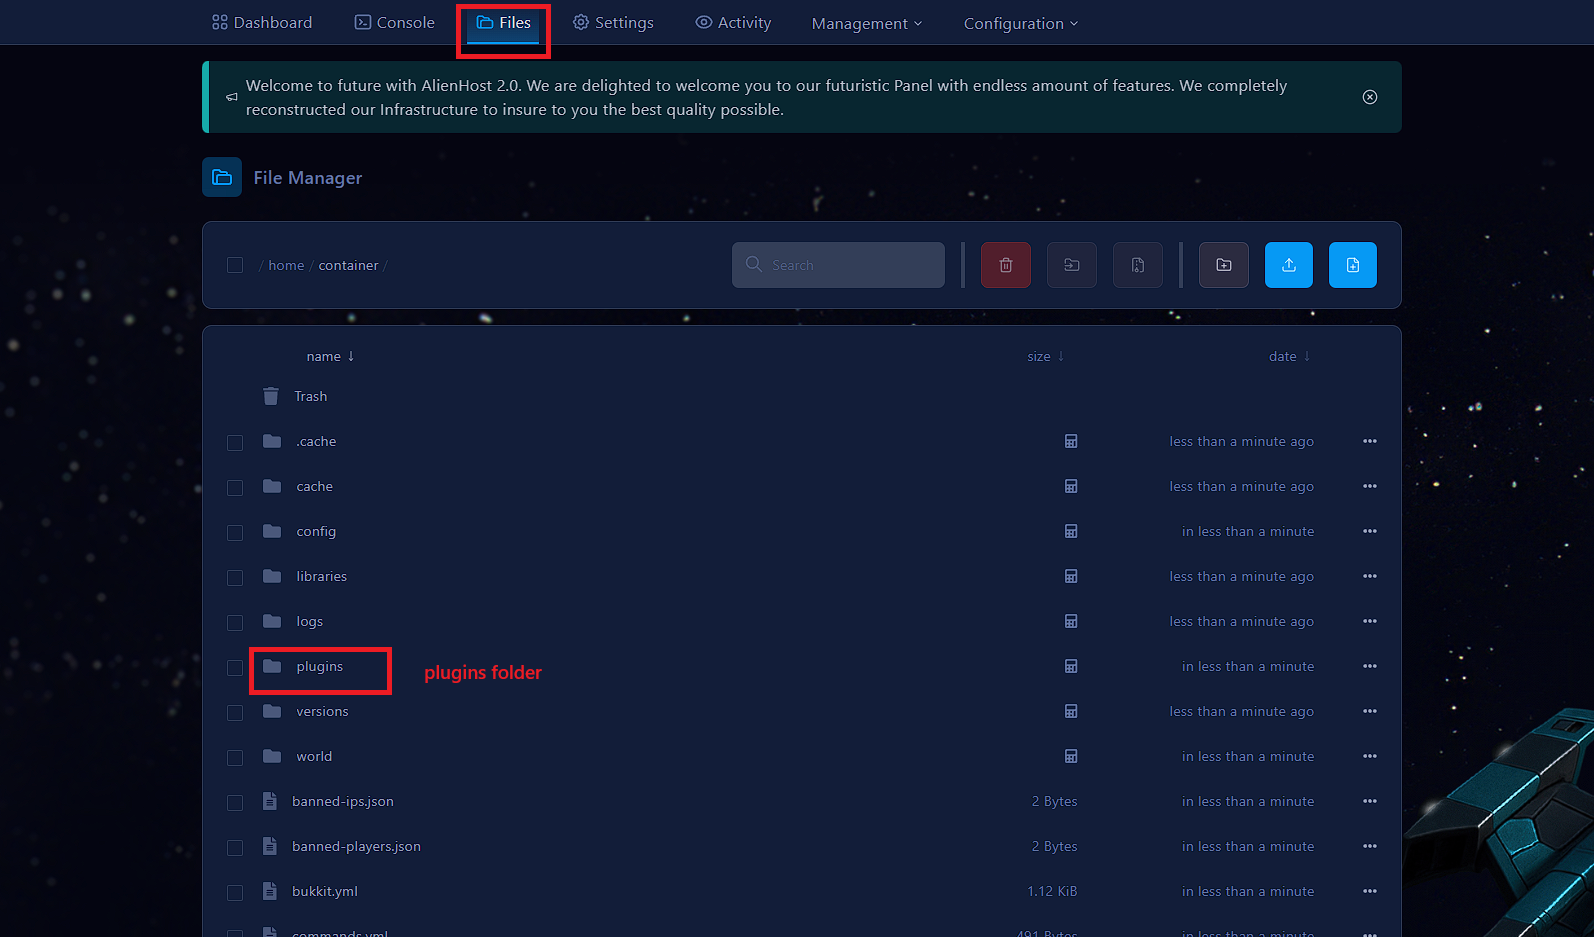
3. Navigate to the directory
Begin by starting your server if it's not already running.
- Next, go to the file manager.
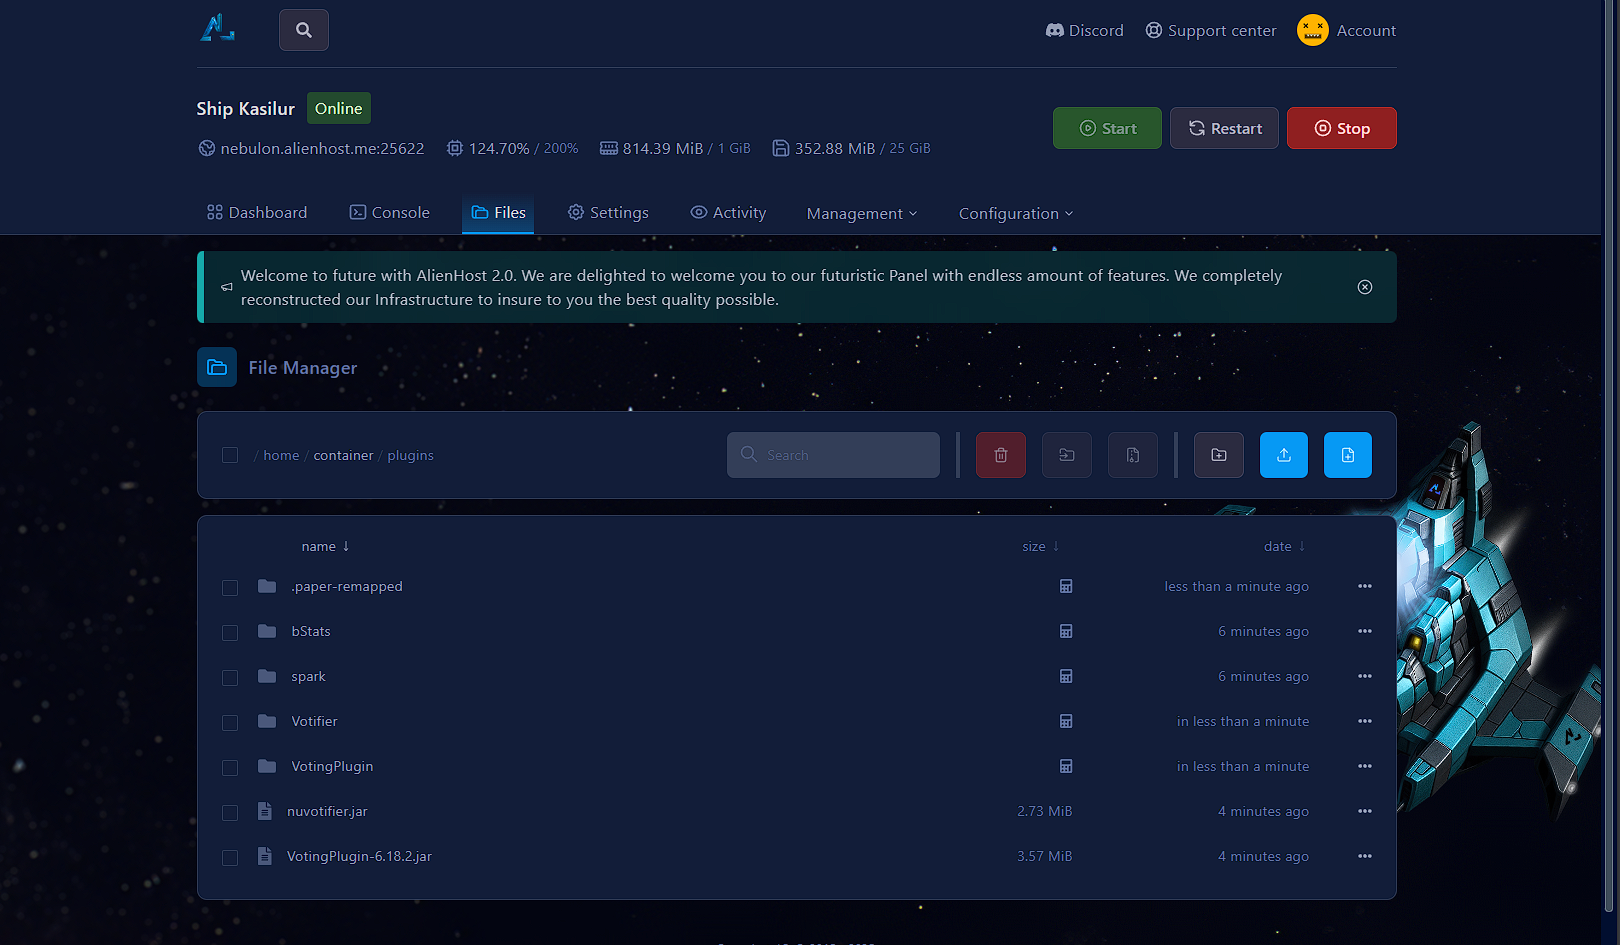
- Within the file manager, locate and navigate to the plugins folder
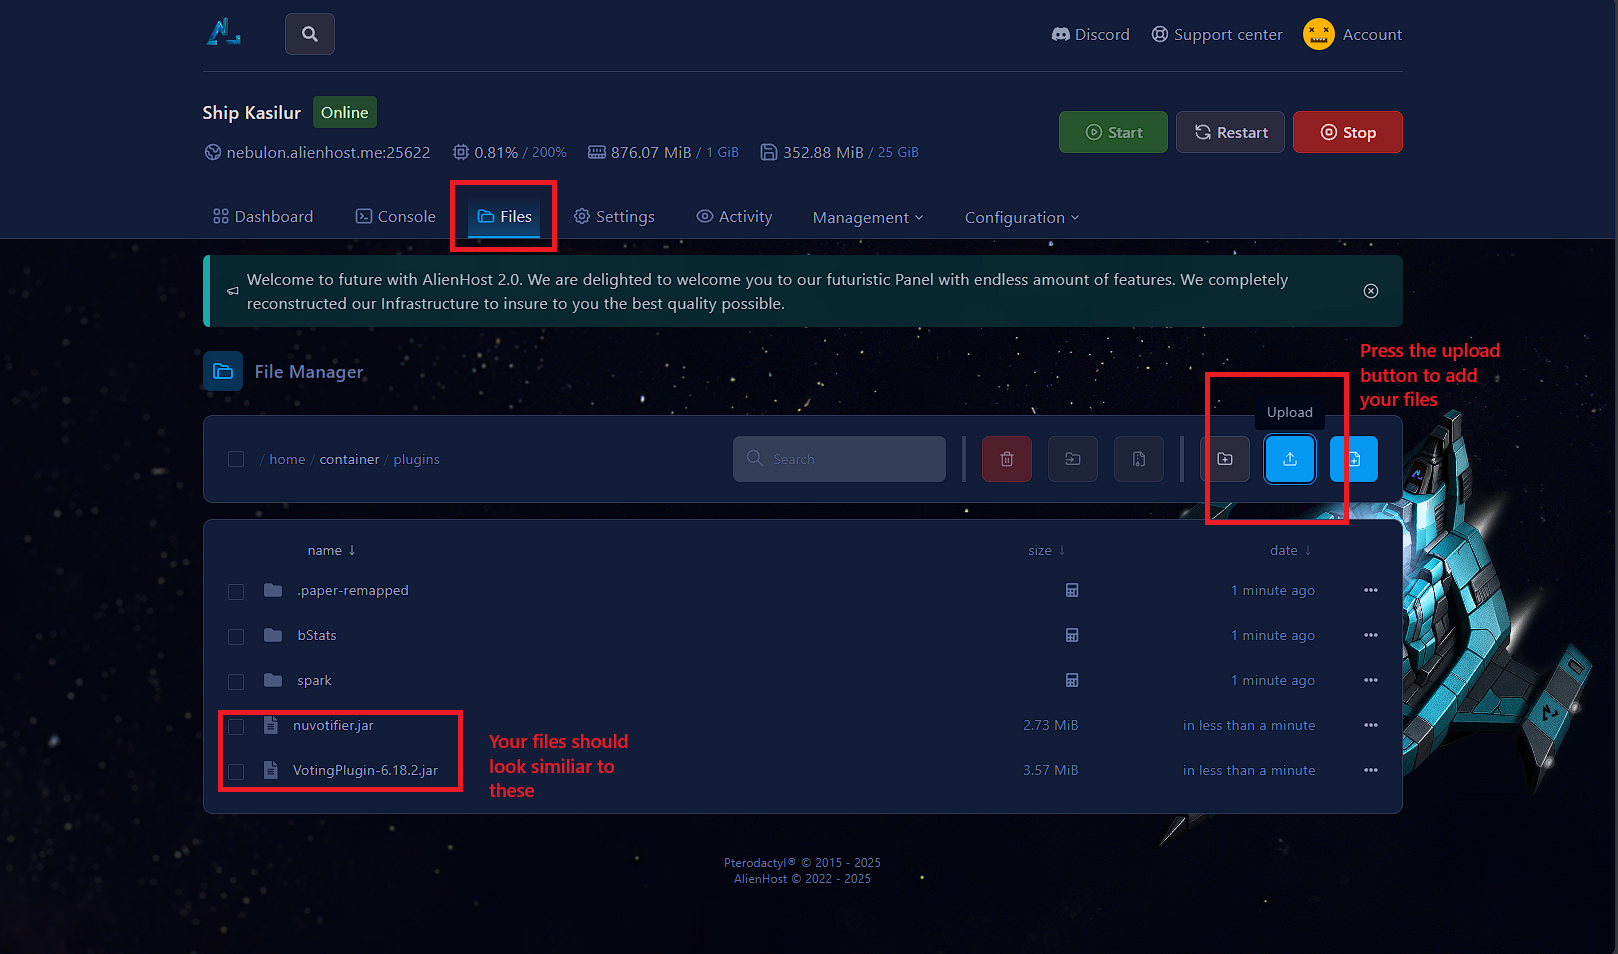
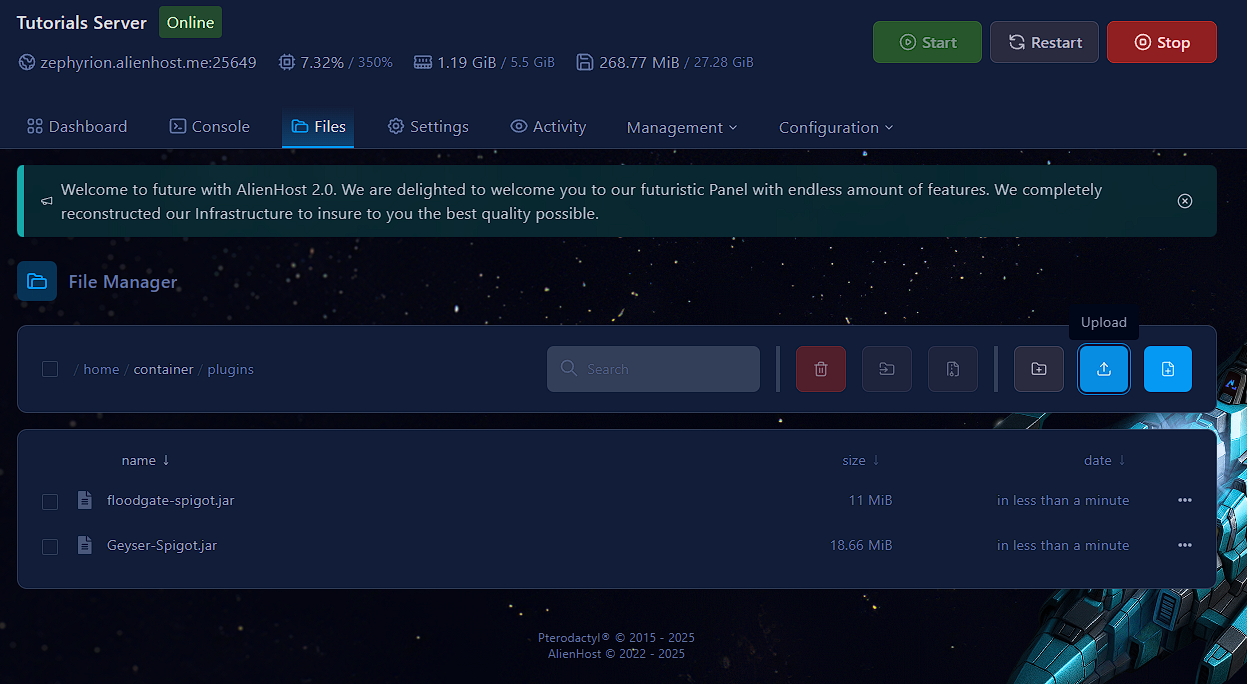
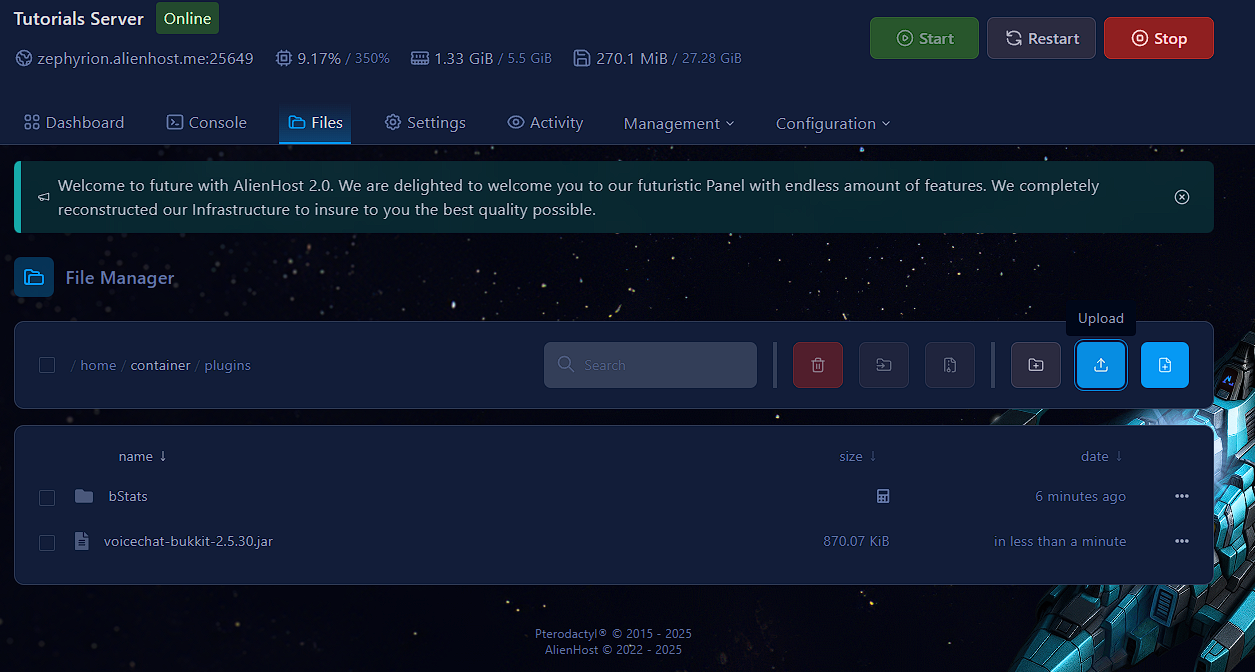
3a. Upload the files
Inside the plugins folder, upload NuVotifier & VotingPlugin
-
To do this, click on the upload button (as shown in the picture below).
-
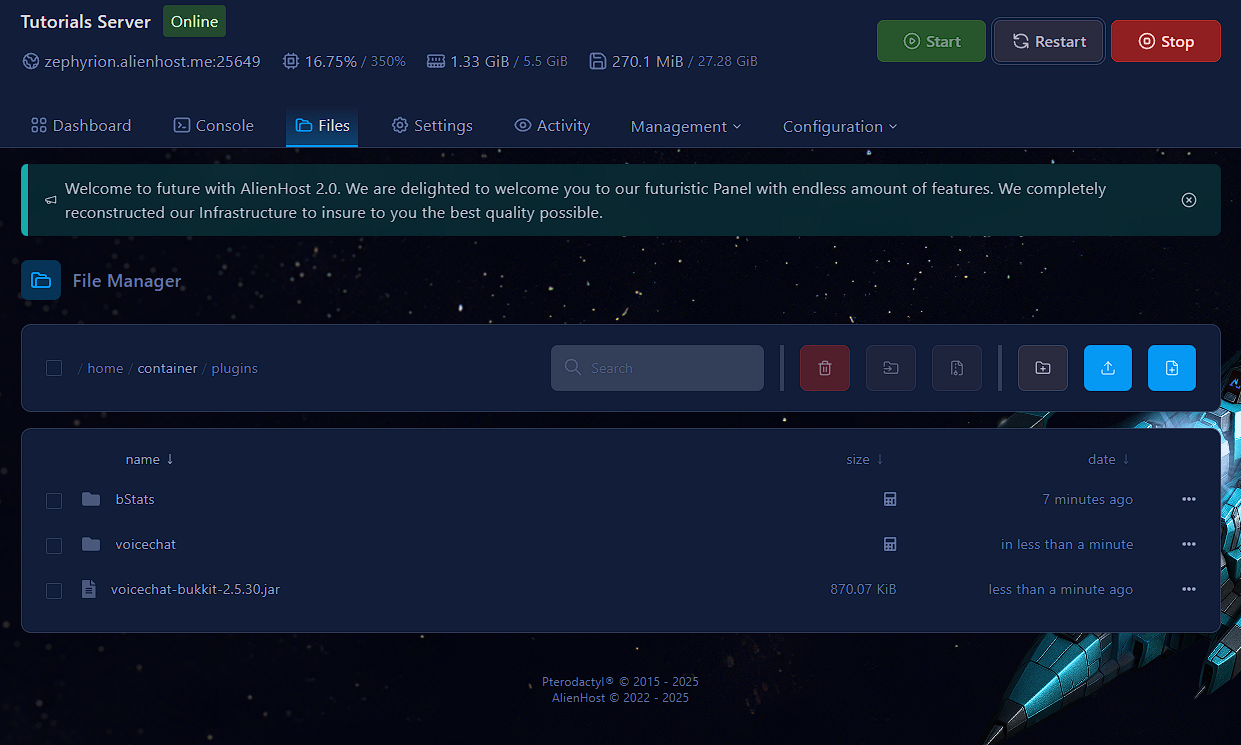
Once the upload is complete, the files will be visible in the file manager.
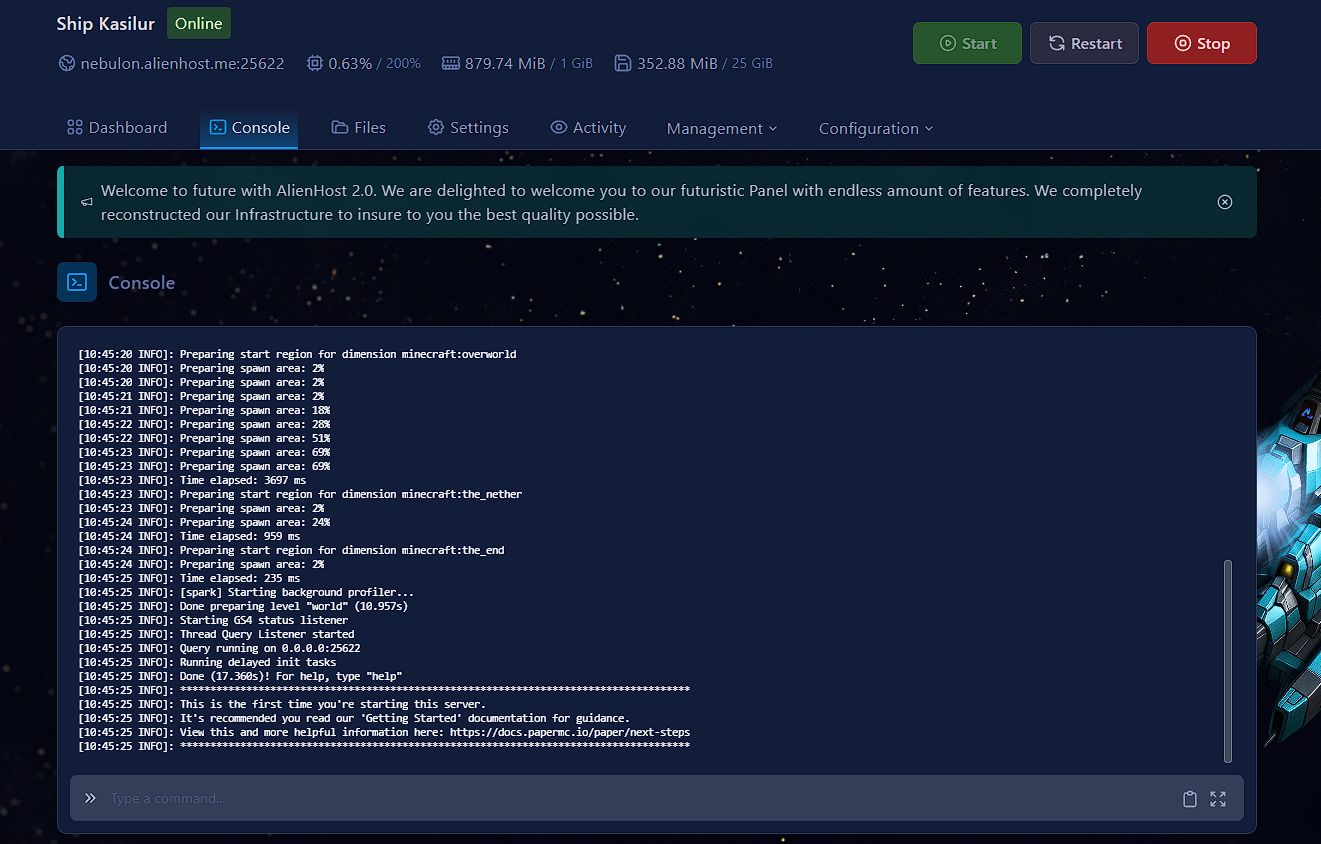
4. Restart the server
Return to the console and press the Restart button, to load the plugins.
5. Configure
Now, return to the plugins folder as you did in steps 3 and 3a. You will see two new folders named "Votifier" and "VotingPlugin." Click on the folder labeled "Votifier."
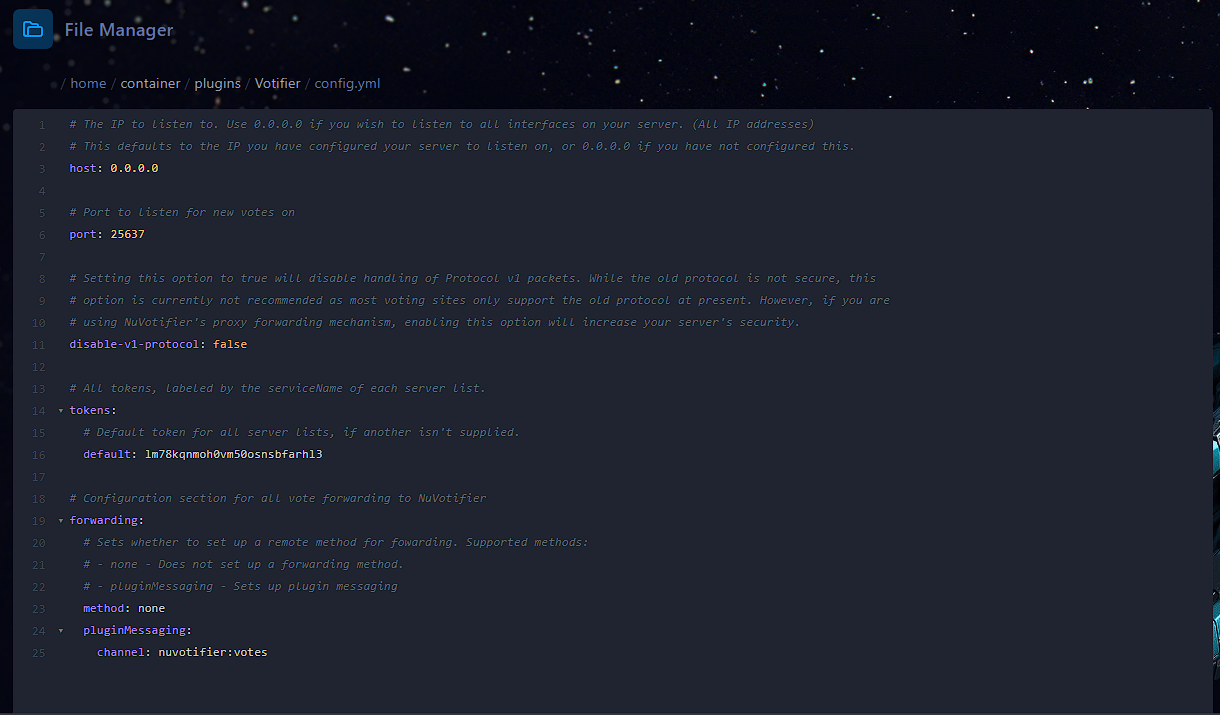
6. Config.yml
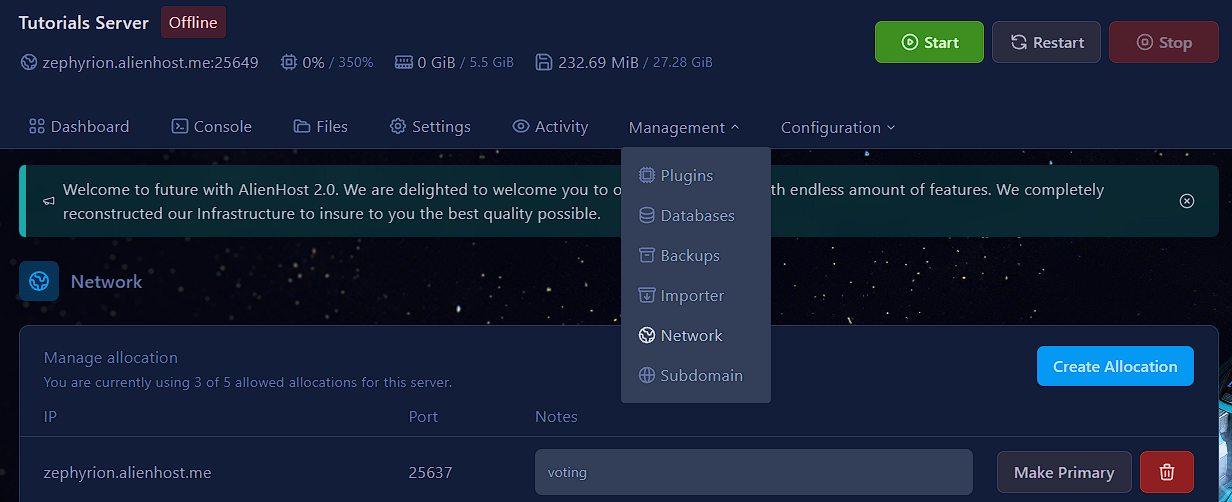
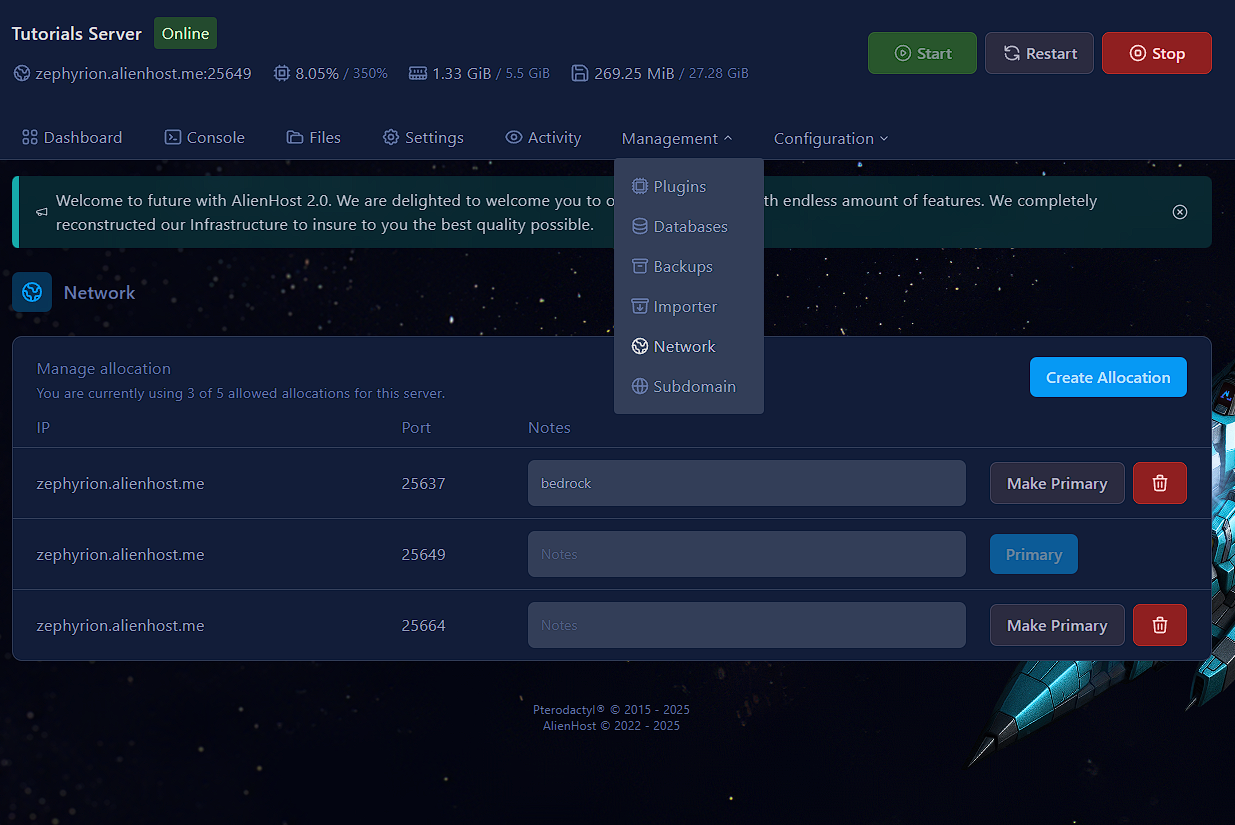
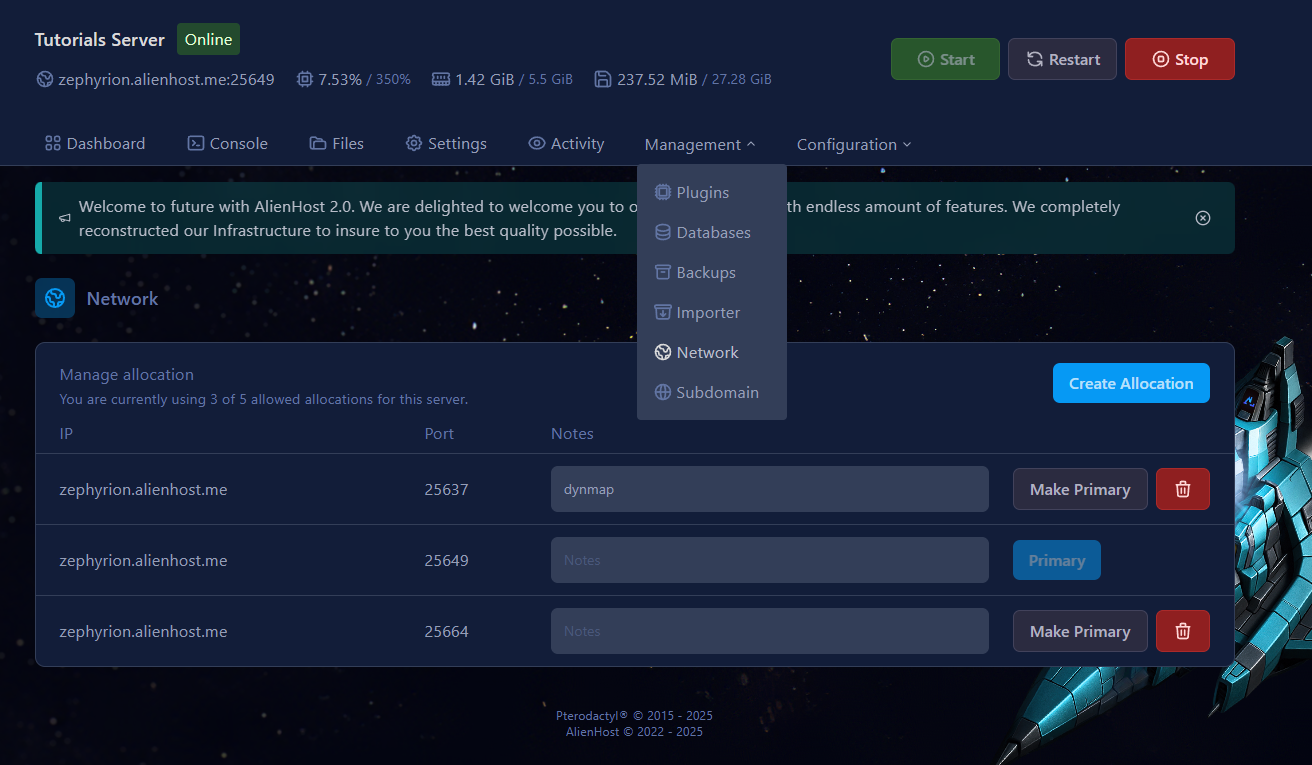
- Inside Votifier's folder open the config.yml and change the port variable to the one allocated in the network tab (in my case, the port is 25637, in yours it may be a different one).
- After copying the port, go back to the config.yml in plugins/Votifier/config.yml and paste the port in the port variable (by replacing 8192 with your actual port)
Setting up voting sites:
the IP can be found with this tutorial
the port can be found in the Network tab
the token can be found in Votifier's config.yml
the public key can be found in plugins/Votifier/rsa/public.key
7. VotingPlugin
Once you've completed the setup for Votifier, proceed to configure VotingPlugin:
In the VotingPlugin folder, you'll see various files. For this tutorial, focus on "VoteSites.yml" and create valid rewards in the "Rewards" folder for your server.
VoteSites.yml:
inside we want to modify EverySiteReward variable (at the bottom of the file).
To add vote sites, we'll do it the easy way. I will create a vote site here
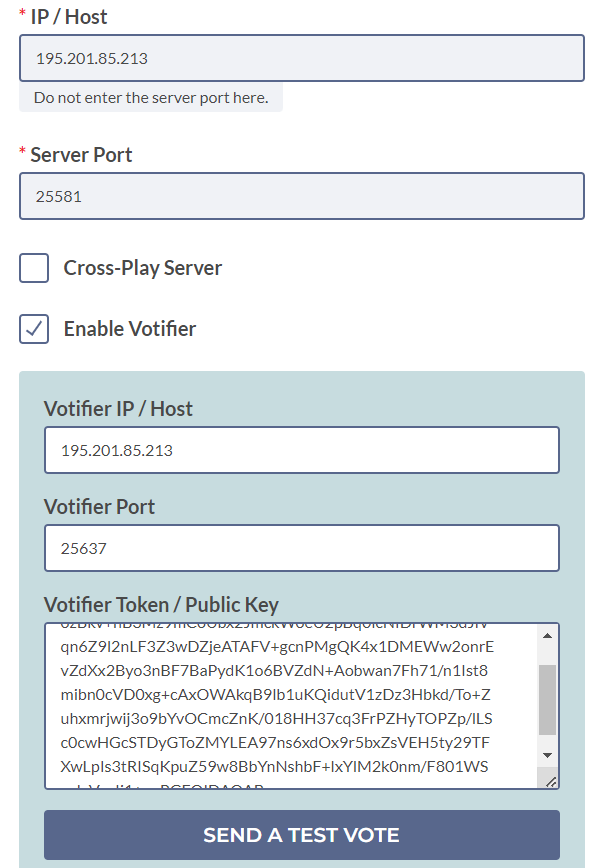
By following this tutorial you can find your server's ip.
Now send a test vote to verify you've done everything correctly
In your server logs, it should look similar to this:
Votifier Test Vote Logs
[12:23:27 INFO]: [Votifier] Got a protocol v2 vote record from /66.175.210.190:46534 -> Vote (from:MinecraftServers.org username:MinecraftServers address:127.0.0.1 timeStamp:1704111807099 additionalData:null)
[12:23:27 INFO]: [VotingPlugin] Received a vote from service site 'MinecraftServers.org' by player 'MinecraftServers'!
[12:23:27 WARN]: [VotingPlugin] VoteSite with service site 'MinecraftServers.org' does not exist, attempting to generate...
[12:23:27 WARN]: [VotingPlugin] VoteSite MinecraftServers_org does not exist with the servicesite 'MinecraftServers.org', creating one, set AutoCreateVoteSites to false to prevent this
[12:23:27 WARN]: [VotingPlugin] VoteSites.MinecraftServers_org is not a configuration section
[12:23:27 INFO]: [VotingPlugin] Current known service sites: MinecraftServers.org
[12:23:27 WARN]: [VotingPlugin] Player MinecraftServers has not joined before, disregarding vote, set AllowUnjoined to true to prevent this
[12:23:31 INFO]: [VotingPlugin] VotingPlugin is up to date! Version: 6.15
You can find your ports in the Network tab
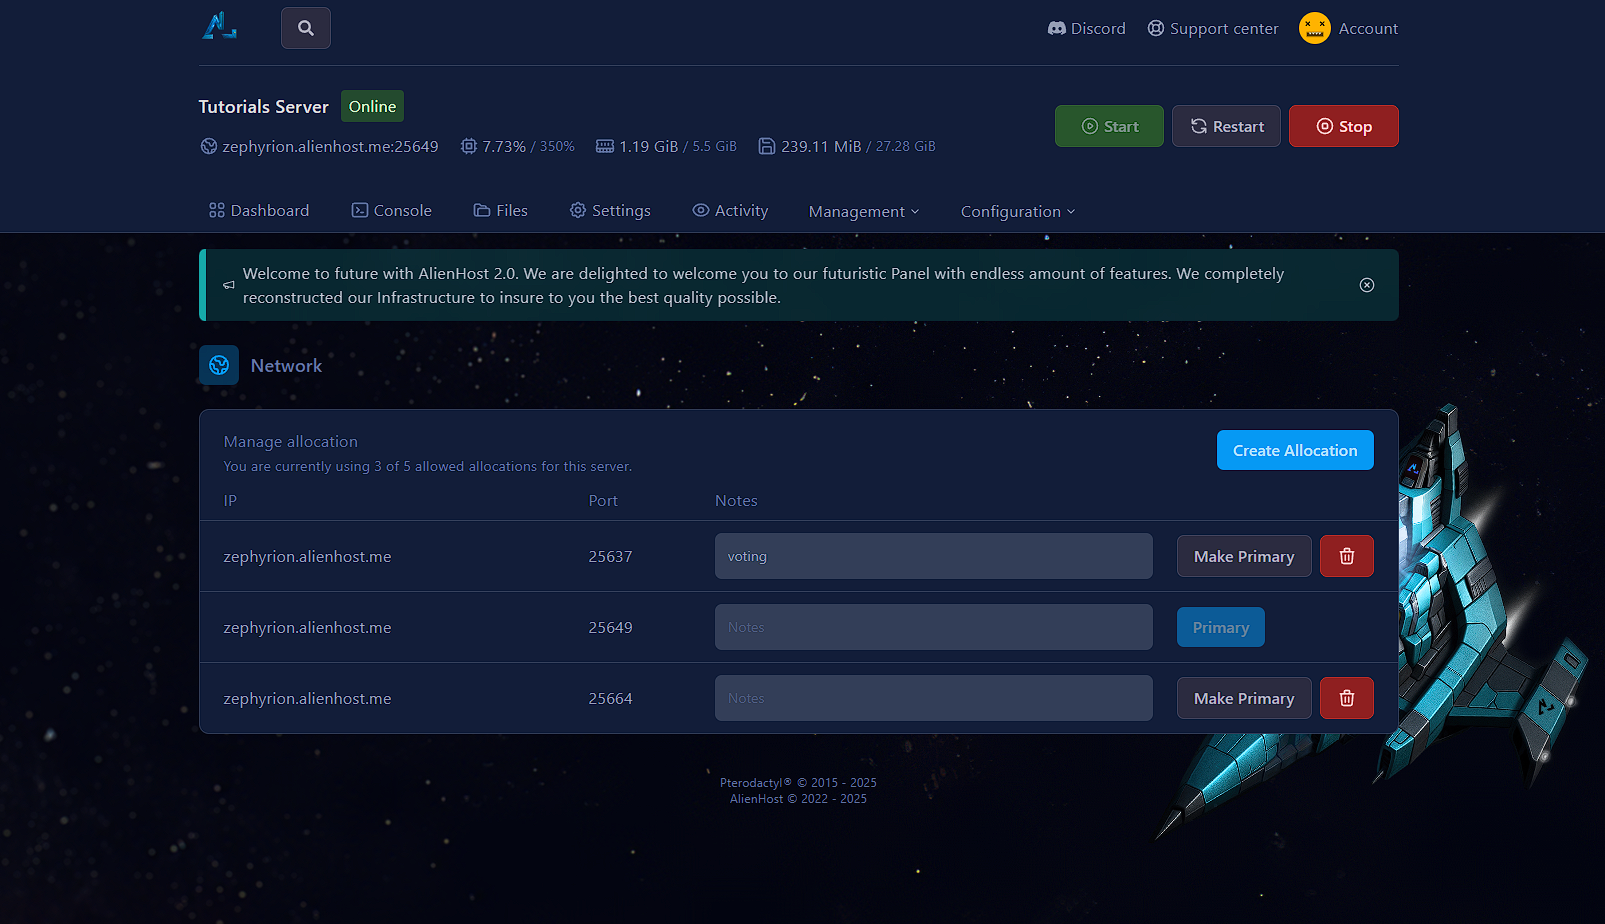
Make sure your plugin is listening on the correct port, you can check in the console when restarting, look for this line: [INFO]: [Votifier] Votifier enabled on socket /[0:0:0:0:0:0:0:0%0]:25637. (My votifier port is 25637 as shown above, yours may be something else)
After sending the test vote, the VoteSites.yml will set up automatically.
MinecraftServers_org:
Enabled: true
ServiceSite: MinecraftServers.org
VoteURL: VoteURL
VoteDelay: 24.0
DisplayItem:
Material: GRASS
Amount: 1
Rewards:
Messages:
Player: '&aThanks for voting on %ServiceSite%!'
# Mine's this, let's break it down:
# Enabled: is a boolean variable, so only true or false, when it's true, if you run /vote, you'll see it in the VoteGUI, if disabled, it's not going to be in the GUI.
# ServiceSite: usually the domain of the voting site, don't modify it
# VoteURL: The URL where your players will vote for your server example: https://minecraftservers.org/server/randomServerID
# VoteDelay: if 24.0, it's going to be 24h, there is VoteDelayMin too if you want the delay to be based on minutes example: VoteDelayMin: 60 which means the next time you can vote is going to be in 60 minutes
# DisplayItem.Material: the item to show in the gui for the vote site
# DisplayItem.Amount: how many Material(s) to show in the vote gui
#Rewards: just ignore that, if you don't know how to setup the plugin, I will show how to give rewards in the next step through EverySiteReward in the bottom of the file.Set the "EverySiteReward" to the name of the rewards file you are about to create:
Rewards (folder):
in plugins/VotingPlugin/Rewards
ExampleBasic.yml
# This is a reward file
# Define rewards in here (Items, commands, etc)
# File name is the reward name, without file extention
# This reward is named "ExampleBasic"
# That is what you put as a reward for other plugins, like VotingPlugin
# DO NOT HAVE DUPLICATE NAMES!!
# Wiki Page:
# https://github.com/BenCodez/AdvancedCore/wiki/Reward-files
# This is basic reward file
# You can have multiple reward files that contain all kinds of rewards
# Below are some basic things you can have, see the advanced example for more
# You can just remove values you don't want (just delete it)
# If you just want money just have a reward file containg only "Money: 100", for example
# You can simply copy and paste from here what you want
# in other reward files, that is the way they are designed
# If true:
# Only allow one item with chance to go through (from items below)
# If no chance specificied it will only give the first item
OnlyOneItemChance: false
# Items to give to user
Items:
# Item
# This is not item display name
# No duplicate names
Diamond:
# Item Material
# https://hub.spigotmc.org/javadocs/spigot/org/bukkit/Material.html
Material: 'DIAMOND'
# Item data value (Eg 1:4, data is 4)
Data: 0
# Will only give Amount if min and max amounts are 0
Amount: 1
# Set item durability
# Set to 0 or remove line for no durability
#Durability: 100
# Random amount of items between Min and Max will be given
# if min and max are not both 0
# Min amount of items
#MinAmount: 1
# Max amount of items
#MaxAmount: 4
# Chance for this specific item to be given
#Chance: 30
# Item name
# Remove this value to have no name
Name: '&aSpecial Diamond'
# Lore
# Remove this value to have no lore
Lore:
- 'Line 1'
# Enchants
# use vanilla names
Enchants:
unbreaking: 1
# Set glowing effect on item (enchanted item effect)
Glow: false
# Skull options
#Skull: 'PLAYERNAME'
# One place to find skull textures is here: https://minecraft-heads.com/
#SkullTexture: 'SKULLTEXTURE'
#SkullURL: 'URL to skull'
# Hide enchants
#ItemFlags:
#- HIDE_ENCHANTS
# CustomModelData nbt tag
#CustomModelData: 100
# Set power of firework
#Power: 1
# Whether or not to break lore into more than 1 line
# Disable for certain custom items if needed
#CheckLoreLenth: true
#LoreLength: -1
# Color of potion bottle
# 0-255
#PotionColor:
#Red: 0
#Green: 0
#Blue: 0
#Potions:
#SPEED:
#Duration: 20
#Amplifier: 1
# Amount of money to give, requires vault
# Use 0 to give none
# Money is not per world
# Use negative to take money
# May need to use a command if it doesn't work
Money: 1000
# Pick random number between min and max money amount
#Money:
# Min: 100
# Max: 3000
#######
# Experience rewards
#######
# Give player experience (not levels)
#EXP: 100
# Pick a random number between min and max EXP amount to give
#EXP:
# Min: 100
# Max: 1000
EXPLevels: 3
# Random amount of EXP levels between 3 to 7
# EXPLevels:
# Min: 3
# Max: 7
# Commands to run
# Use %player% for player name
# Remove for no commands
Commands:
- say hi
#Commands:
# Commands here will be run by console
# Console:
# - 'say %player% was lucky'
# Commands here are run by player
# Player:
# - 'vote total'
# The messages are sent when rewards above are given to user
# set to '' to give no message (or just remove the option)
Messages:
Player: '&aMessage on reward'
Broadcast: '&aThis is a broadcast'
# Can also do this to message player
#Message: '&aMessage to player'After setting up your rewards (you can check the above codeblock for some examples)
back in VotesSites.yml scroll to the very bottom and you'll find
EverySiteReward: {}remove the {} and set it to the name of your rewards file without the extension (.yml)
so:
EverySiteReward: ExampleBasicYou may want to use Vault for permissions and economy features
Velocity
1. Requirements
VotingPlugin (Velocity + All Servers You Want Rewards On)
2. On Velocity
Go to the File Manager
Open the "plugins" folder
upload Nuvotifier, VotingPlugin and the mysql driver
2a. Configuring votifier
Restart the velocity server
Go in the plugins folder
Go in votifier's folder
click on the config.yml
change the port variable to your extra port in the network tab
2b. Configuring VotingPlugin
In votingplugin's folder, open bungeeconfig.yml
Create a database and set the given information
Set BungeeMethod to PLUGINMESSAGING
Set SendVotesToAllServers: true (for a reward on each server) or false (reward on whatever server player connects to first)
Set AllowUnjoined to true
3. On Spigot/Paper (Backend)
Go to the File Manager
Open the "plugins" folder
upload VotingPlugin
3a. Configuring VotingPlugin (backend)
Open VotingPlugin's folder, go to BungeeSettings.yml
Set BungeeMethod to PLUGINMESSAGING
Set UseBungeecord to true
Go back in VotingPlugin's folder, open config.yml
Set AllowUnjoined to true
Set the MySQL database's credentials to the one you've done in step 2b.
Geyser + Floodgate
Standalone (Spigot & Forks)
1. Login
Get started by logging into the panel here
2. Panel
After you log into your account (or if you're already logged in), click on the server where you want to allow bedrock support.
3. Navigate to the directory
Begin by starting your server if it's not already running.
- Next, go to the file manager.
- Within the file manager, locate and navigate to the plugins folder
3a. Upload the files
Inside the plugins folder, upload Geyser & Floodgate
-
To do this, click on the upload button (as shown in the picture below).
-
Once the upload is complete, the files will be visible in the file manager.
4. Restart the server
Return to the console and press the "restart" button. (to load the plugins folder)
5. Configure
Now, return to the plugins folder as you did in steps 3 and 3a. You will see two new folders named "Geyser-Spigot" and "floodgate".
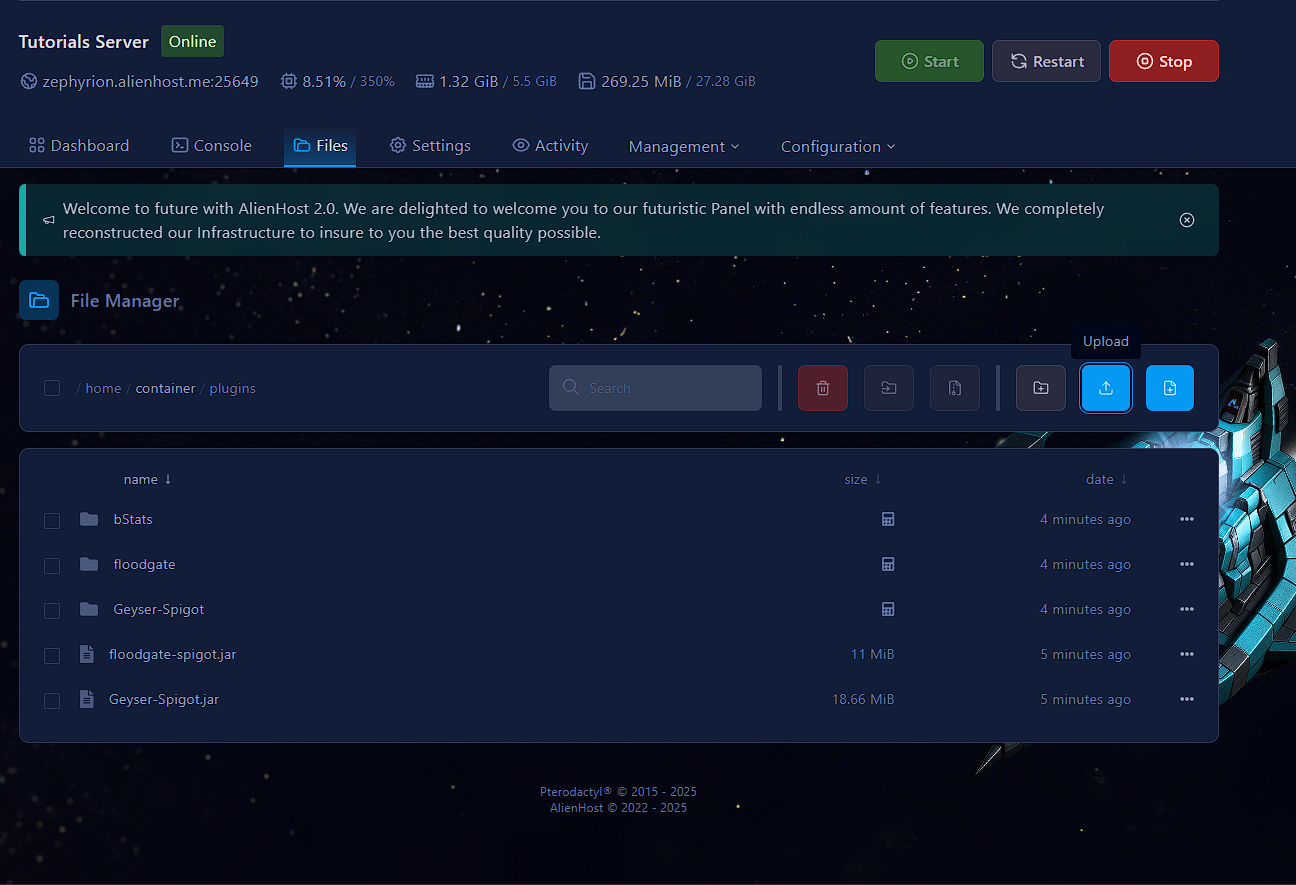
5a. Geyser
Click on the folder labeled "Geyser-Spigot"
Inside, you will find a file named config.yml , open it
default config.yml
# --------------------------------
# Geyser Configuration File
#
# A bridge between Minecraft: Bedrock Edition and Minecraft: Java Edition.
#
# GitHub: https://github.com/GeyserMC/Geyser
# Discord: https://discord.gg/geysermc
# Wiki: https://wiki.geysermc.org/
#
# NOTICE: See https://wiki.geysermc.org/geyser/setup/ for the setup guide. Many video tutorials are outdated.
# In most cases, especially with server hosting providers, further hosting-specific configuration is required.
# --------------------------------
bedrock:
# The IP address that will listen for connections.
# Generally, you should only uncomment and change this if you want to limit what IPs can connect to your server.
#address: 0.0.0.0
# The port that will listen for connections
port: 19132
# Some hosting services change your Java port everytime you start the server and require the same port to be used for Bedrock.
# This option makes the Bedrock port the same as the Java port every time you start the server.
# This option is for the plugin version only.
clone-remote-port: false
# The MOTD that will be broadcasted to Minecraft: Bedrock Edition clients. This is irrelevant if "passthrough-motd" is set to true
# If either of these are empty, the respective string will default to "Geyser"
motd1: "Geyser"
motd2: "Another Geyser server."
# The Server Name that will be sent to Minecraft: Bedrock Edition clients. This is visible in both the pause menu and the settings menu.
server-name: "Geyser"
# How much to compress network traffic to the Bedrock client. The higher the number, the more CPU usage used, but
# the smaller the bandwidth used. Does not have any effect below -1 or above 9. Set to -1 to disable.
compression-level: 6
# Whether to enable PROXY protocol or not for clients. You DO NOT WANT this feature unless you run UDP reverse proxy
# in front of your Geyser instance.
enable-proxy-protocol: false
# A list of allowed PROXY protocol speaking proxy IP addresses/subnets. Only effective when "enable-proxy-protocol" is enabled, and
# should really only be used when you are not able to use a proper firewall (usually true with shared hosting providers etc.).
# Keeping this list empty means there is no IP address whitelist.
# Both IP addresses and subnets are supported.
#proxy-protocol-whitelisted-ips: [ "127.0.0.1", "172.18.0.0/16" ]
remote:
# The IP address of the remote (Java Edition) server
# If it is "auto", for standalone version the remote address will be set to 127.0.0.1,
# for plugin versions, it is recommended to keep this as "auto" so Geyser will automatically configure address, port, and auth-type.
# Leave as "auto" if floodgate is installed.
address: auto
# The port of the remote (Java Edition) server
# For plugin versions, if address has been set to "auto", the port will also follow the server's listening port.
port: 25565
# Authentication type. Can be offline, online, or floodgate (see https://github.com/GeyserMC/Geyser/wiki/Floodgate).
# For plugin versions, it's recommended to keep the `address` field to "auto" so Floodgate support is automatically configured.
# If Floodgate is installed and `address:` is set to "auto", then "auth-type: floodgate" will automatically be used.
auth-type: online
# Allow for password-based authentication methods through Geyser. Only useful in online mode.
# If this is false, users must authenticate to Microsoft using a code provided by Geyser on their desktop.
allow-password-authentication: true
# Whether to enable PROXY protocol or not while connecting to the server.
# This is useful only when:
# 1) Your server supports PROXY protocol (it probably doesn't)
# 2) You run Velocity or BungeeCord with the option enabled in the proxy's main config.
# IF YOU DON'T KNOW WHAT THIS IS, DON'T TOUCH IT!
use-proxy-protocol: false
# Forward the hostname that the Bedrock client used to connect over to the Java server
# This is designed to be used for forced hosts on proxies
forward-hostname: false
# Floodgate uses encryption to ensure use from authorised sources.
# This should point to the public key generated by Floodgate (BungeeCord, Spigot or Velocity)
# You can ignore this when not using Floodgate.
# If you're using a plugin version of Floodgate on the same server, the key will automatically be picked up from Floodgate.
floodgate-key-file: key.pem
# For online mode authentication type only.
# Stores a list of Bedrock players that should have their Java Edition account saved after login.
# This saves a token that can be reused to authenticate the player later. This does not save emails or passwords,
# but you should still be cautious when adding to this list and giving others access to this Geyser instance's files.
# Removing a name from this list will delete its cached login information on the next Geyser startup.
# The file that tokens will be saved in is in the same folder as this config, named "saved-refresh-tokens.json".
saved-user-logins:
- ThisExampleUsernameShouldBeLongEnoughToNeverBeAnXboxUsername
- ThisOtherExampleUsernameShouldAlsoBeLongEnough
# Specify how many seconds to wait while user authorizes Geyser to access their Microsoft account.
# User is allowed to disconnect from the server during this period.
pending-authentication-timeout: 120
# Bedrock clients can freeze when opening up the command prompt for the first time if given a lot of commands.
# Disabling this will prevent command suggestions from being sent and solve freezing for Bedrock clients.
command-suggestions: true
# The following three options enable "ping passthrough" - the MOTD, player count and/or protocol name gets retrieved from the Java server.
# Relay the MOTD from the remote server to Bedrock players.
passthrough-motd: true
# Relay the player count and max players from the remote server to Bedrock players.
passthrough-player-counts: true
# Enable LEGACY ping passthrough. There is no need to enable this unless your MOTD or player count does not appear properly.
# This option does nothing on standalone.
legacy-ping-passthrough: false
# How often to ping the remote server, in seconds. Only relevant for standalone or legacy ping passthrough.
# Increase if you are getting BrokenPipe errors.
ping-passthrough-interval: 3
# Whether to forward player ping to the server. While enabling this will allow Bedrock players to have more accurate
# ping, it may also cause players to time out more easily.
forward-player-ping: false
# Maximum amount of players that can connect. This is only visual at this time and does not actually limit player count.
max-players: 100
# If debug messages should be sent through console
debug-mode: false
# Allow third party capes to be visible. Currently allowing:
# OptiFine capes, LabyMod capes, 5Zig capes and MinecraftCapes
allow-third-party-capes: false
# Allow third party deadmau5 ears to be visible. Currently allowing:
# MinecraftCapes
allow-third-party-ears: false
# Allow a fake cooldown indicator to be sent. Bedrock players otherwise do not see a cooldown as they still use 1.8 combat.
# Please note: if the cooldown is enabled, some users may see a black box during the cooldown sequence, like below:
# https://cdn.discordapp.com/attachments/613170125696270357/957075682230419466/Screenshot_from_2022-03-25_20-35-08.png
# This can be disabled by going into Bedrock settings under the accessibility tab and setting "Text Background Opacity" to 0
# This setting can be set to "title", "actionbar" or "false"
show-cooldown: title
# Controls if coordinates are shown to players.
show-coordinates: true
# Whether Bedrock players are blocked from performing their scaffolding-style bridging.
disable-bedrock-scaffolding: false
# If set, when a Bedrock player performs any emote, it will swap the offhand and mainhand items, just like the Java Edition keybind
# There are three options this can be set to:
# disabled - the default/fallback, which doesn't apply this workaround
# no-emotes - emotes will NOT be sent to other Bedrock clients and offhand will be swapped. This effectively disables all emotes from being seen.
# emotes-and-offhand - emotes will be sent to Bedrock clients and offhand will be swapped
emote-offhand-workaround: "disabled"
# The default locale if we dont have the one the client requested. Uncomment to not use the default system language.
# default-locale: en_us
# Specify how many days images will be cached to disk to save downloading them from the internet.
# A value of 0 is disabled. (Default: 0)
cache-images: 0
# Allows custom skulls to be displayed. Keeping them enabled may cause a performance decrease on older/weaker devices.
allow-custom-skulls: true
# The maximum number of custom skulls to be displayed per player. Increasing this may decrease performance on weaker devices.
# Setting this to -1 will cause all custom skulls to be displayed regardless of distance or number.
max-visible-custom-skulls: 128
# The radius in blocks around the player in which custom skulls are displayed.
custom-skull-render-distance: 32
# Whether to add any items and blocks which normally does not exist in Bedrock Edition.
# This should only need to be disabled if using a proxy that does not use the "transfer packet" style of server switching.
# If this is disabled, furnace minecart items will be mapped to hopper minecart items.
# Geyser's block, item, and skull mappings systems will also be disabled.
# This option requires a restart of Geyser in order to change its setting.
add-non-bedrock-items: true
# Bedrock prevents building and displaying blocks above Y127 in the Nether.
# This config option works around that by changing the Nether dimension ID to the End ID.
# The main downside to this is that the entire Nether will have the same red fog rather than having different fog for each biome.
above-bedrock-nether-building: false
# Force clients to load all resource packs if there are any.
# If set to false, it allows the user to connect to the server even if they don't
# want to download the resource packs.
force-resource-packs: true
# Allows Xbox achievements to be unlocked.
# THIS DISABLES ALL COMMANDS FROM SUCCESSFULLY RUNNING FOR BEDROCK IN-GAME, as otherwise Bedrock thinks you are cheating.
xbox-achievements-enabled: false
# Whether player IP addresses will be logged by the server.
log-player-ip-addresses: true
# Whether to alert the console and operators that a new Geyser version is available that supports a Bedrock version
# that this Geyser version does not support. It's recommended to keep this option enabled, as many Bedrock platforms
# auto-update.
notify-on-new-bedrock-update: true
# Which item to use to mark unavailable slots in a Bedrock player inventory. Examples of this are the 2x2 crafting grid while in creative,
# or custom inventory menus with sizes different from the usual 3x9. A barrier block is the default item.
unusable-space-block: minecraft:barrier
# bStats is a stat tracker that is entirely anonymous and tracks only basic information
# about Geyser, such as how many people are online, how many servers are using Geyser,
# what OS is being used, etc. You can learn more about bStats here: https://bstats.org/.
# https://bstats.org/plugin/server-implementation/GeyserMC
metrics:
# If metrics should be enabled
enabled: true
# UUID of server, don't change!
uuid: 638741bf-5803-41be-92a9-7e8677e7a73c
# ADVANCED OPTIONS - DO NOT TOUCH UNLESS YOU KNOW WHAT YOU ARE DOING!
# Geyser updates the Scoreboard after every Scoreboard packet, but when Geyser tries to handle
# a lot of scoreboard packets per second can cause serious lag.
# This option allows you to specify after how many Scoreboard packets per seconds
# the Scoreboard updates will be limited to four updates per second.
scoreboard-packet-threshold: 20
# Allow connections from ProxyPass and Waterdog.
# See https://www.spigotmc.org/wiki/firewall-guide/ for assistance - use UDP instead of TCP.
enable-proxy-connections: false
# The internet supports a maximum MTU of 1492 but could cause issues with packet fragmentation.
# 1400 is the default.
mtu: 1400
# Whether to connect directly into the Java server without creating a TCP connection.
# This should only be disabled if a plugin that interfaces with packets or the network does not work correctly with Geyser.
# If enabled on plugin versions, the remote address and port sections are ignored
# If disabled on plugin versions, expect performance decrease and latency increase
use-direct-connection: true
# Whether Geyser should attempt to disable compression for Bedrock players. This should be a benefit as there is no need to compress data
# when Java packets aren't being handled over the network.
# This requires use-direct-connection to be true.
disable-compression: true
config-version: 4what you want to modify is the port variable (line 19) to your allocated port in the network tab, here a tutorial on how to
the auth-type variable (line 53) should be set to "floodgate".
Now you are done, try & join
Velocity
Make sure to not be using "NONE" forwarding. You'll need an extra port for this tutorial
1. On Velocity
Go in your file manager
Go in plugins folder, upload GeyserMC and Floodgate
Restart the server
Go back in the plugins folder
Click on the "Geyser-Velocity" folder
in the Geyser folder, click on config.yml
in bedrock.port set that to your extra port
then, scroll down to remote.auth-type
set auth-type to floodgate.
In floodgate:
set set-floodgate-data to true.
2. On Backend (Spigot/Paper)
On all of your backend servers, upload Floodgate-Spigot in the plugins folder
restart the server to load the plugin
download the key.pem from Velocity's Floodgate
upload the downloaded key.pem in the Floodgate-Spigot's folder (on your backend)
Simple Voice Chat
Standalone (Spigot/Paper & Forks)
1. Download
Download Simple Voice Chat (Bukkit)
You need the Fabric/Forge version on your client
You need an extra port allocation
2. Login & Place The Plugin
Log in the panel
- Go in the file manager
- click on the folder named "plugins"
2a. Inside the plugins folder upload the file:
2b. Restart the server in the console tab
2c. Return to the plugins folder as you did in step 2.
3. Configuring
In the plugins folder, you should now see a "voicechat" folder. Click on it
Inside you'll find the file "voicechat-server.properties", click on it
On line 5 you'll find the port variable and a predefined value (24454) change it to the extra port allocation you made, change the port variable's value to your extra port.
Velocity
You'll need extra ports for this tutorial. 1 for each server with voicechat plugin.
1. Every server on the same node
On The Backends:
Download SimpleVoiceChat Bukkit
Go to the "plugins" folder and upload it.
Restart the server.
Inside the "plugins" folder, you will find a "voicechat" folder. Click on it.
Open the "voicechat.properties" file.
On line 5 you'll find the port variable. Set it to the additional port's value
On The Proxy:
Install SimpleVoiceChat for Velocity
The plugin will automatically detect the port of each voice chat server and will forward everything to the correct destination.
2. Servers on different nodes
Follow the steps for "Every server on the same node" and:
set voice_host on the backend servers to their (the backend's) actual IPv4
Chunky
Pre-generate world
What is Chunky?
Chunky is a Minecraft plugin that lets you pregenerate your world’s chunks, reducing the load on your CPU for future tasks.
How to use Chunky?
Installation
1. Download Chunky (make sure you choose the correct version and the compatible platform for the jar file)
2. Upload Chunky on the mods or plugins folder (Forge/Fabric and Spigot/Paper respectively)
3. Restart your server
Usage
Let's start by choosing a radius for the pregeneration task, the command's format should be the following:chunky radius <int> where <int> is an integer such as: 100, 3300, 60000 and so on
(Optional) If you don't want to pregenerate the default world (usually the world named "world" unless modified) you can run the following command: chunky world <String> where <String> can be world_the_end, world_nether, bedwars_map, skyblock, spawn and so on, make sure that the world exists.
To start the pregeneration, use the command chunky start
To stop the pregeneration, use the command chunky cancel
Additional Information
If you want to pause the pregeneration, run the command chunky pause, to exit the pause you can run the command chunky continue.
Do you think the plugin is sending too many logs in the console? You can use the command chunky quiet <int> where <int> is the frequency in seconds of the progress, example values: 5, 8, 20.
If you don't want to see the logs at all, use the command chunky silent (run the command again to see the logs).
If using Paper, you can adjust the number of worker threads used by world generation to speed up the task. This can be done by setting in config/paper-global.yml via the worker-threads option within paper-global.yml.
Don't pregenerate an exaggerated radius for your wolrd, please check out the following website to see what the approximate size your world's going to be after pregeneration: World Size Calculator.
Where do I get the velocity.yml?
Your velocity.yml server may look like this
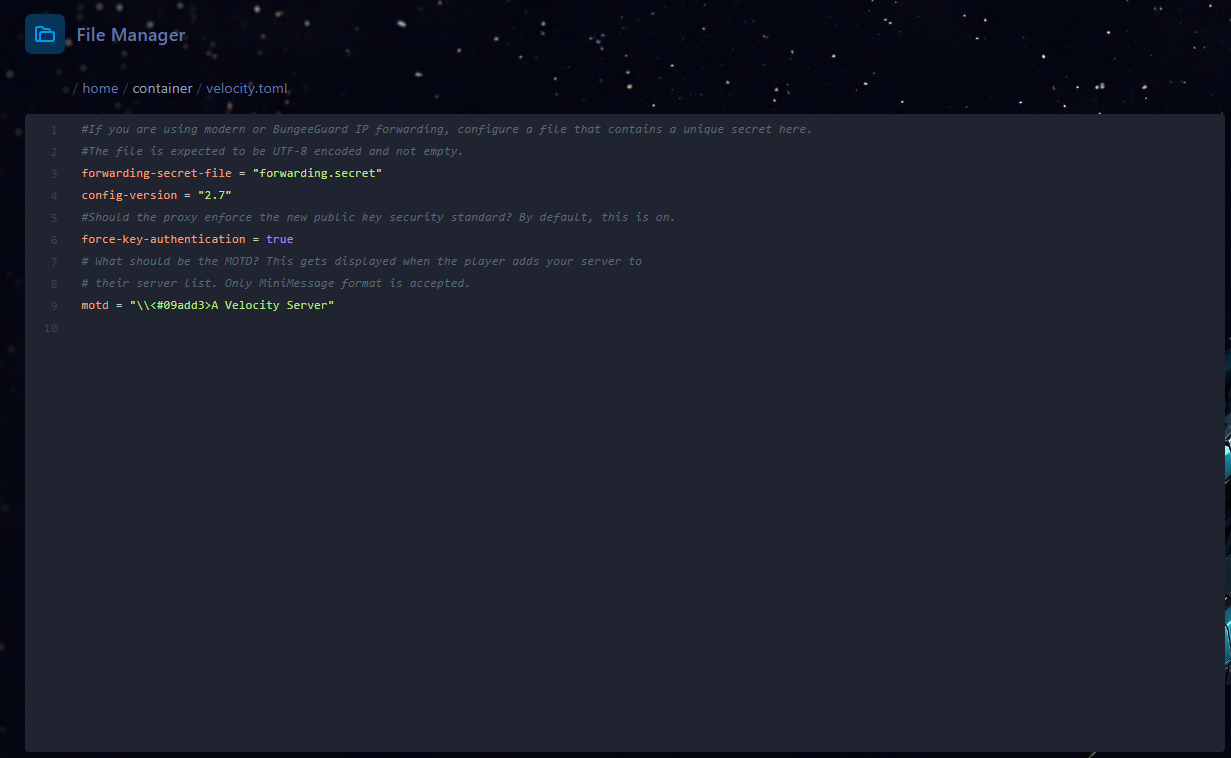
To obtain the entire file, head to this page. Now copy and paste the content into your velocity.yml.
FreedomChat
Disable Chat Signing - Paper
What is chat signing?
Chat signing is a feature introduced by Mojang in the 1.19 update that links every message you send to your Minecraft account. This allows messages to be directly reportable to the Mojang Moderation team if needed.
Why disable chat signing?
Chat signing introduced the common chat message validation failure error that many players encounter, often resulting in players being kicked from the server. By disabling chat signing, you can prevent this error and stop players from getting disconnected. Additionally, turning off chat signing removes the server-side reporting system, which means players won’t be able to report messages through Mojang’s moderation tools.
How to disable chat signing?
On Paper (and Spigot's forks):
1. Disable enforce-secure-profiles in server.properties through the File Manager, by setting it to false.


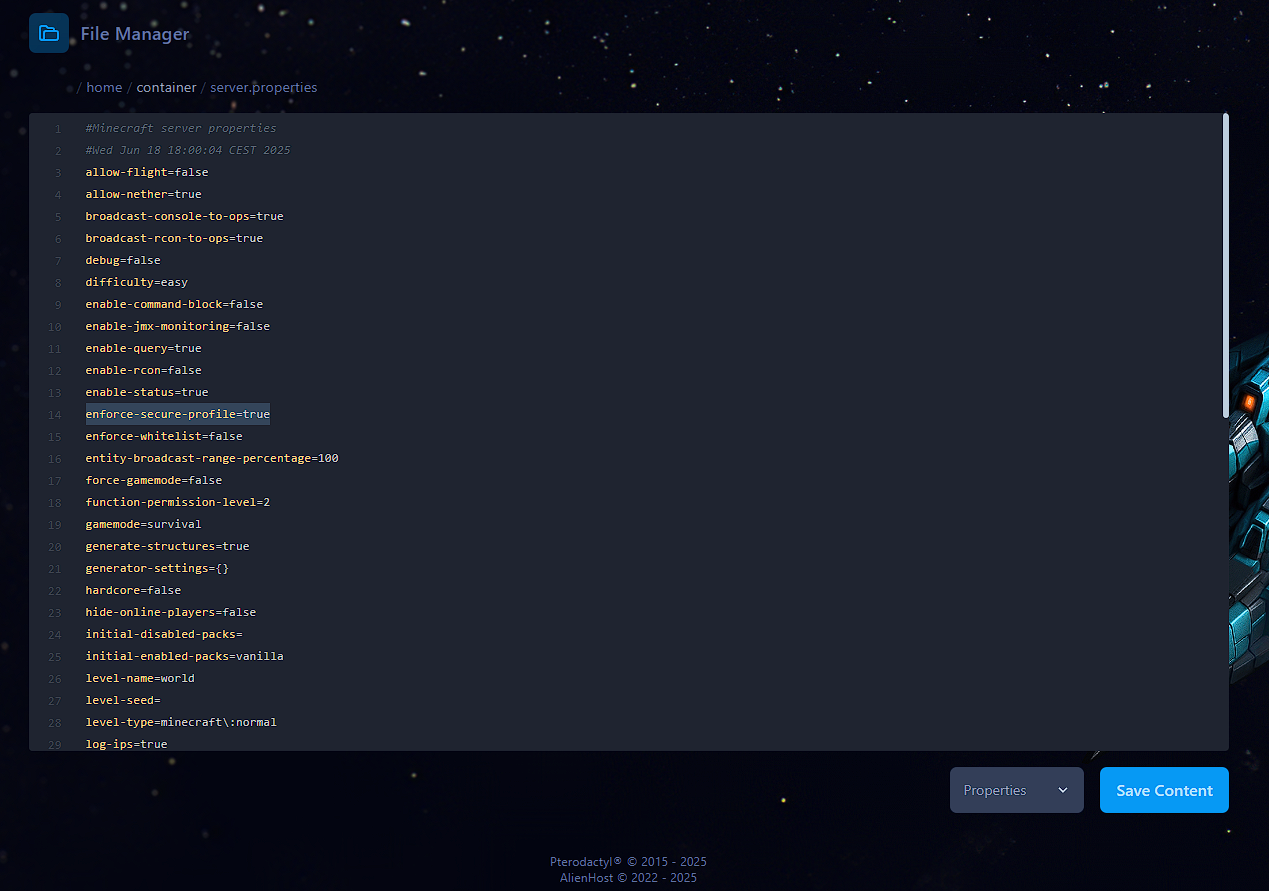
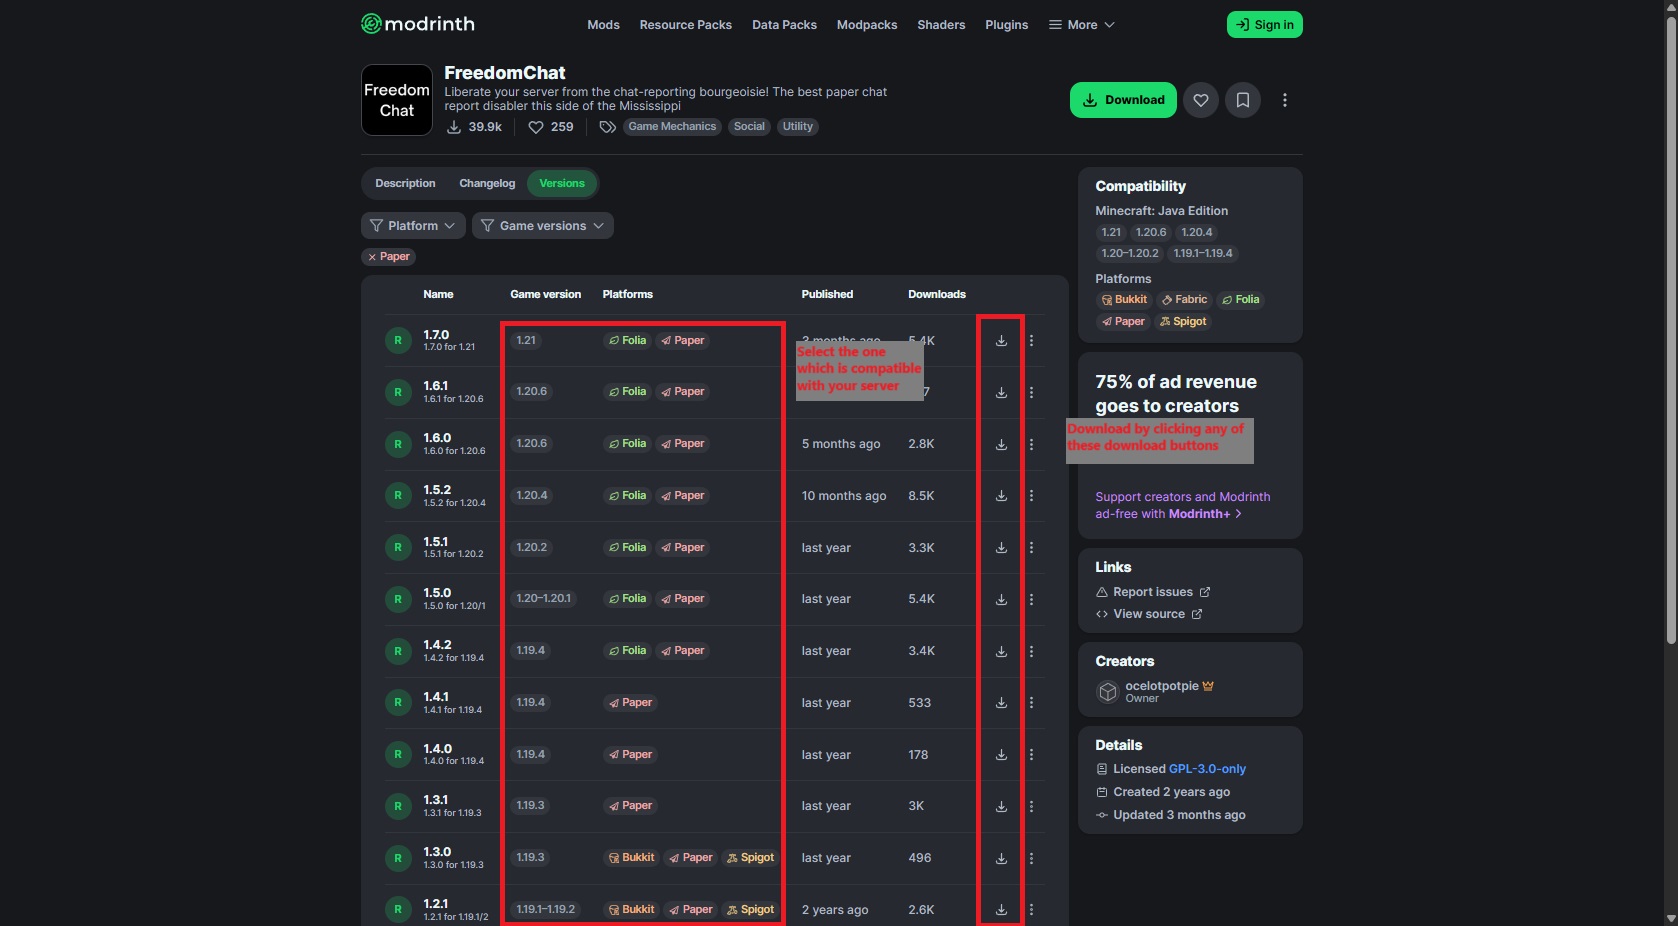
2. Download FreedomChat (choose the version compatible with yours)
3. Upload FreedomChat in the plugins folder through the Files Manager
File names may not correspond.
Delete Player Data
How to delete player data
Where is it stored?
In the Files Manager, open the world folder (or the folder of your main world). Inside, locate the playerdata folder. Within this folder, you’ll find files named in the format <uuid>.dat, where <uuid> represents the player's UUID (universally unique id).
Plugin stored data:
Some plugins store some of the player's data, such as EssentialsX, in this scenario the plugin's data is stored in the following path: plugins\Essentials\userdata, so the path would be plugins\<Plugin Name>\<data folder/file>
How to recognize a data file/folder?
Usually local storages use the .db file extension, example: luckperms-h2-v2.mv.db
In other cases storage files may use the following file extension: .json | .yml | .conf | .toml Do note that these are locally stored databases.
For external Databases such as MariaDB/MySQL, delete the database from the panel and create a new one. Ensure sure to reconfigurate the credentials within your plugin's configuration.
How To Admin
Files and Commands - Vanilla
Do note that the information here is based on the default files and folders provided by Mojang
Files
In this section you'll learn what a folder or a file is for.
Importance is divided in the following way: Low, Medium, High, Essential
Low: Not something you'll be using at all or doesn't cause issues at all
Medium: Something you may use/the server uses it or may cause a few issues
High: Important information stored within it, deleting may lead to server corruption or other issues
Essential: needed for the server to run, the server won't run without it
| File/Folder name |
Description |
Importance |
| libraries | A folder. It store libraries for your server, it's preferred to not delete these as they are needed for the server, nothing will happen if you delete them as they'll regenerate themselves. Don't delete while server's running | Low |
| .cache | A folder. Cache, stores data temporarily, preferrably keep it. Don't delete while server's running | Medium |
| logs | A folder. Stores your server's logs, by deleting it once in a while you can save up some storage. | Low |
| versions | A folder. As long as the server.jar is in the main directory, it won't cause issues deleting it. It'll autoregenerate. Don't delete while server's running | Medium |
| world | A folder. Don't delete it, it contains some player data, datapack if added and your worlds' data. | High |
|
banned-ips.json banned-players.json |
Both are files. You usually don't delete these unless you want to unban every person who has been banned in the past | Medium |
| server,jar | A file. Don't delete, it's your server's core | Essential |
Commands
The following table contains "essential" or useful commands which a server administrator should be aware of.
| Command | Description | Usage |
|
/op /deop |
Allows you to execute any command available within the server (if |
/op <username> /deop <username> /op MelonOof /deop MelonOof |
| /gamemode | Change yout gamemode to one of the following: survival, creative, spectator and adventure. |
/gamemode <gamemode> /gamemode survival /gamemode creative /gamemode adventure |
| /stop | This command will stop your server (works the same way as the stop button in the panel's console) | /stop |
| /restart | This command will restart your server (works the same way as the restart button in the panel's console) | /restart |
| /whitelist | The command itself doesn't do anything, you need additional arguments for it to work, you can toggle on/off whitelist, add and remove players from whitelist |
/whitelist on || /whitelist off /whitelist add <username> /whitelist add MelonOof /whitelist remove <username> /whitelist remove MelonOof /whitelist list |
| /worldborder |
Manage the world border. With this command you can: |
/worldborder add <diameter> /worldborder set <diameter> /worldborder get |
| /ban | Ban players permanently from your server |
/ban <username> [<reason>] /ban MelonOof Too Juicy |
| /pardon | Unban players from your server |
/pardon <username> /pardon MelonOof |
| /setworldspawn | Set the server's default (re)spawn point the the location you are at | /setworldspawn |
|
/tp /teleport |
Teleport to a location, teleport a player to a location or teleport to a player |
/tp <x> <y> <z> /tp <username> <x> <y> <z> /tp <username> <username> |
| /weather | Sets the weather to one of the following clear|rain|thunder with an optional duration in ticks (1 second = 20 ticks) |
/weather <weather> [<duration>] /weather clear 200 |
| /give | Give yourself or someone else one or multiple items | /give <username> <item> [<amount>] |
| /help | Get to know about any other command you may need, the ones listed here are the essential ones for a server administrator | /help |
Essential plugins for your server - Paper
Server Core
EssentialsX: EssentialsX is a free and open-source plugin, it's been in the community since 2015, it's well known for being feature rich and constantly updated
zEssentials: A paid and open-source alternative, it's been developed in 2024, by Maxlego08. It supports both Paper and Folia, it provides similiar features to EssentialsX's and a modular structure (you enable and disable what you need)
Ban System
AdvancedBan: AdvancedBan is a free and open-source plugin developed since 2015, its last update was on October 2020. It offers database support and discord hooks through addons. It is still compatible with Paper 1.21+
AdvancedBanX: A fork of AdvancedBan, which is also free and open source, as of 2024, it's being actively developed on to provide more features, it works with AdvancedBan's addons.
BanManager: An AdvancedBan(X) free and open-source alternative offering a web interface for both admins and players.
LiteBans; A paid close-source plugin offering a web interface. As of 2024 it is being actively developed on.
Economy
Vault: Vault in itself is not an Economy plugin, rather it allows the usage of various economy plugins by hooking them into it. This plugin is quite essential for today's servers, most economy related plugins use its API as a standard, for actual economy, the Server Core plugins support it.
PlayerPoints: Ever tought to have a second economy? PlayerPoints allows you to do so, offering great management over the economy. The configuration is simple and user friendly.
Permissions
LuckPerms: LuckPerms is a community standard as of 2024, providing seamless permission management through both in-game commands and a web interface.
Tab and Scoreboard
TAB: TAB is a free and open-source plugin developed by Neznamy, it offers various features and supports servers as old as Minecraft Java 1.5.X, it's configuration is easy to understand and with great customizability.
AntiCheat:
Grim: Grim is one of the best free and open-source anticheats available within the community, offering various checks with the least false positive possible.
NoCheatPlus: NoCheatPlus is a great free and open-source plugin, it offers great customizability and various checks with partial support for Geyser (bedrock players).
Vulcan: Vulcan is a paid anticheat sold for about $20, it's said to be one of the best anticheats available on the market
Polar: Polar anticheat is a subscription based anticheat offering great combat checks for 1.8.X
Combat Logging
CombatLogX: CombatLogX is a plugin developed by SirBlobman (affiliated with the AlienUniverse brand). The plugin offers various hooks for plugins such as PlaceholderAPI and WorldGuard.
NPCs
Citizens: Citizens is a feature rich open source plugin, supporting various entities and paths, it hooks into Dnizen for npc scripting and much more.
ZNPCsPlus: ZNPCsPlus is a fork a ZNPCs, ZNPCsPlus is a minimalistic, performance focused plugin, in comparison to Citizens it's much more lightweight, but offers less features. Great for lobbies
Placeholders
PlaceholderAPI: PlaceholderAPI is a community standard plugin, providing support for placeholders hence allowing dynamic values. Most plugins support it, it offers various expansions and is actively developed.
Menu Creation
Disable the Nether and The End
If you want to disable the Nether and the End dimensions on your Minecraft server, follow the steps below based on your server type.
Disabling the Nether
Method 1: Using server.properties (Vanilla & Paper/Spigot)
-
Stop your server.
-
Open the
server.propertiesfile in a text editor. -
Locate the following line:
allow-nether=true -
Change it to:
allow-nether=false -
Save the file and restart your server.
Disabling the End
Method 1: Using bukkit.yml (Spigot & Paper)
-
Stop your server.
-
Open the
bukkit.ymlfile in a text editor. -
Locate the following section:
settings: allow-end: true -
Change it to:
settings: allow-end: false -
Save the file and restart your server.
Network Protocol Error
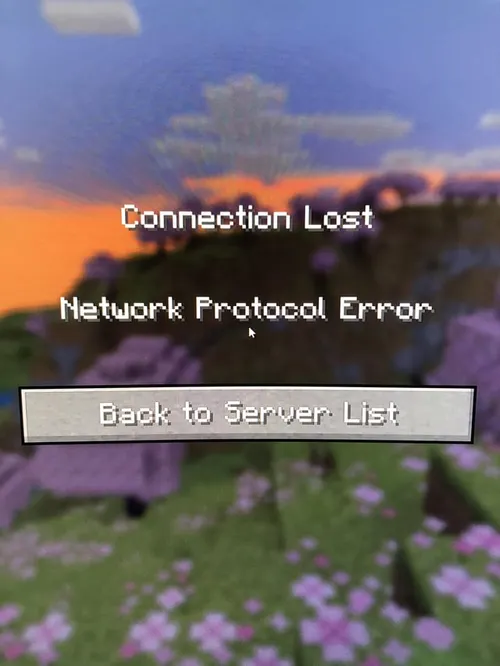
“Network protocol error” often happens when the version of Minecraft you’re using isn’t matching up with the version the server is running. It might also show up if the server or your connection has issues—like an incorrect IP address, firewall settings blocking your connection, or even a plugin error. Here are a few things you can try:
• Double-check that your Minecraft client has the exact same version as your server. Example: the server is on 1.20, for example, make sure you’re launching Minecraft 1.20.
• Confirm you’re using the right IP and port.
• Make sure your server plugins or mods are updated and support the game version you want to play on.
Server not starting properly
Is your server not starting properly? Here are some possible fixes and steps to find the issue.
-
Check the Console: Look in your Control Panel’s console (our custom panel) for any error messages that appear right before the server goes offline.
-
Review Your Plugins/Mods: If you recently added a plugin or mod, try temporarily removing it. Sometimes outdated or incompatible plugins cause the server to crash.
-
Check Server Settings: Make sure your server is on a compatible version. If it’s a modded server, you’ll want to ensure the mods match the server’s version.
-
Monitor Resource Usage: If your server has a lot of players or mods, it might need a higher plan to give it enough CPU power.
If this didn't help please open a ticket at Alien Universe's Discord Server, under technical.
Why use External Databases over Local Databases
In the world of Minecraft server plugins and mods, data management is crucial for everything from player stats tracking to world state saving. Many developers face the decision of choosing between local databases (e.g., SQLite) and external databases (e.g., MySQL, MongoDB) for storing and accessing this data. While each option has its merits, performance is often the deciding factor. In this article, we’ll focus on the performance implications of using external databases over local databases for Minecraft plugins.
What are external Databases?
External databases are databases hosted outside of the server. Unlike local databases, which are within the files of your server, external databases use a network connection to handle data. Examples of such databases are MySQL, MariaDB and MongoDB. They are designed to handle large amounts of data and concurrent access, making them ideal for applications that need to manage data from multiple sources or handle heavy loads efficiently.
What are local Databases?
Local databases are databases located within your plugins' files. They are often file-based, storing data directly on the local filesystem, and don't require a network connection for access. Common examples include SQLite, H2, YAML, TOML and JSON. They are usually used by default for your plugins, and work well when handling small amount of data. However, they are generally less suited for high concurrency or large-scale data handling when compared to external databases.
Conclusion
It's preferred for you as a server owner to make use of external databases (One will be provided for free for you to use. If you're unfamiliar with creating databases, please refer to this article for guidance).
Plan
Plan - Paper
What is Plan?
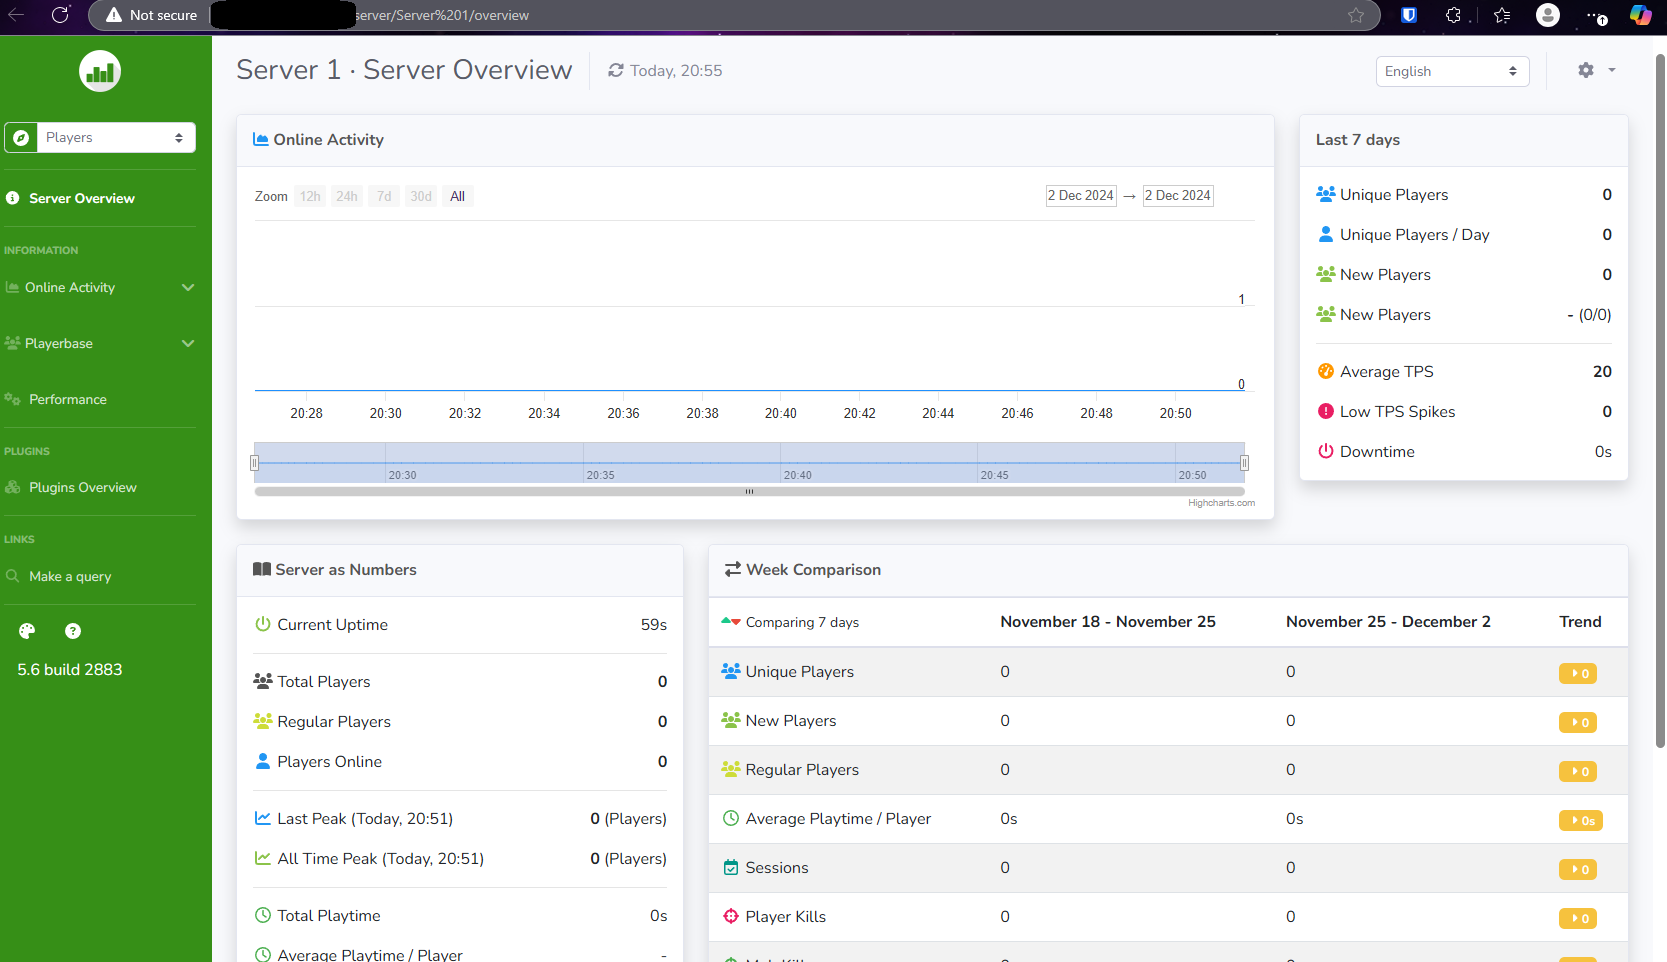
Plan is a plugin that provides detailed analytics for Minecraft servers, tracking player activity, server performance, and engagement. It features a web-based dashboard, multi-server support, and integrations with popular plugins. Ideal for monitoring server health, understanding player behavior, and improving retention, it helps server admins make data-driven decisions.
Requirements
Additional port (or network allocation)
Java 11+
Installation
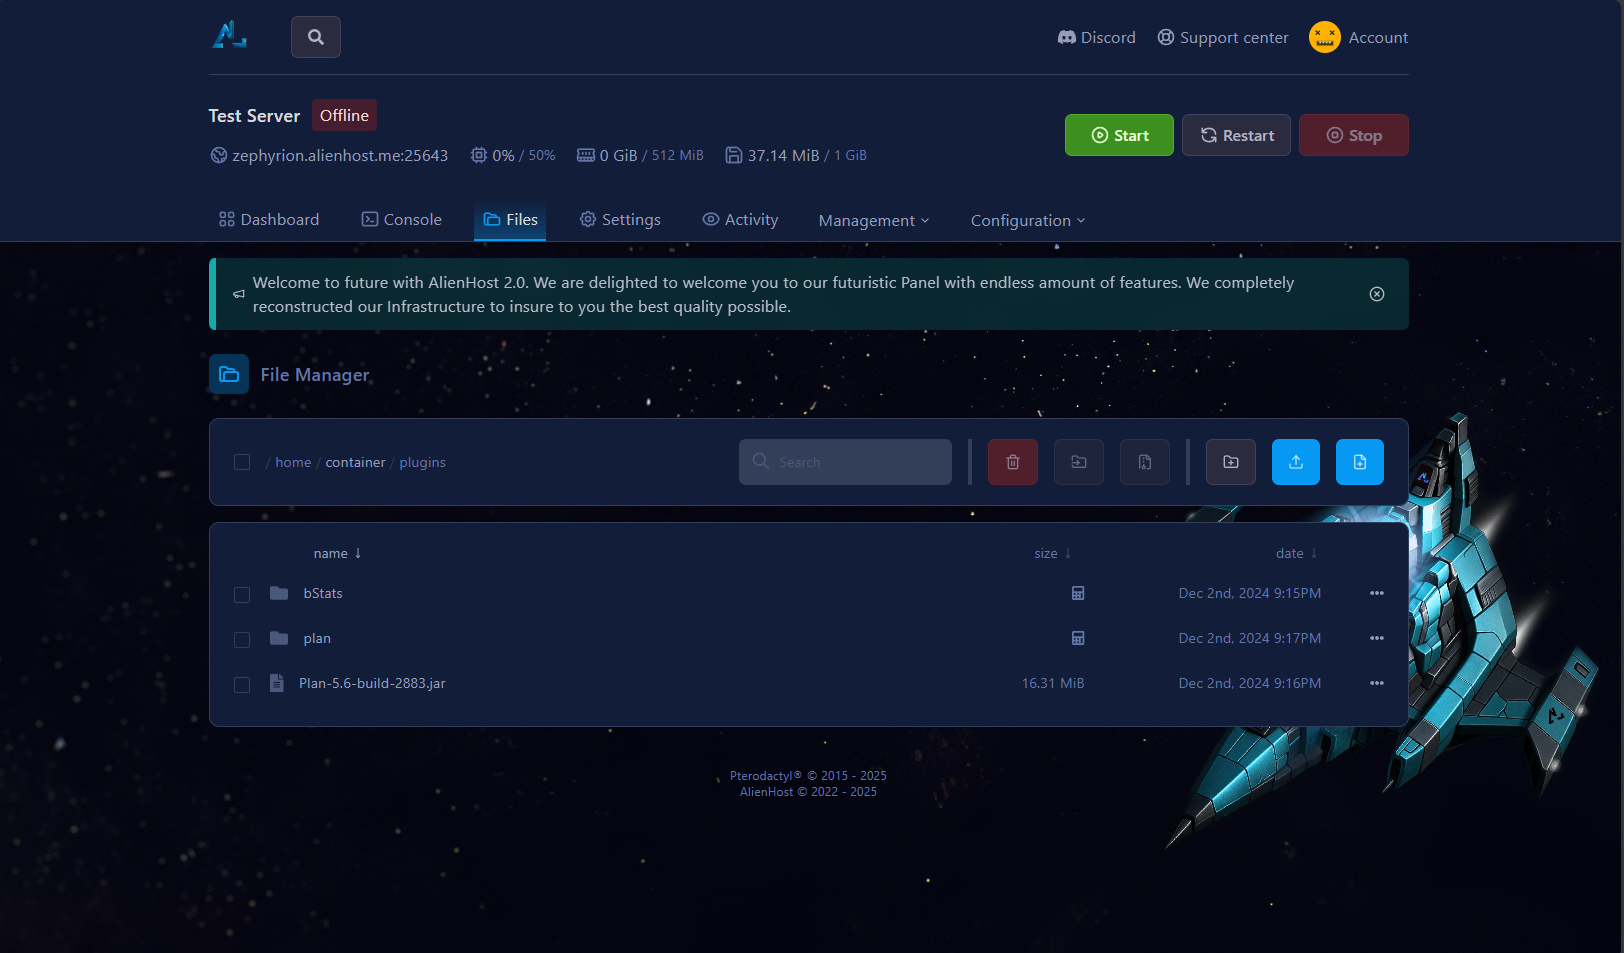
Download Plan
Place Plan.jar to the plugin directory through the file manager in the plugins folder

Restart the server to load the folders of the plugins.
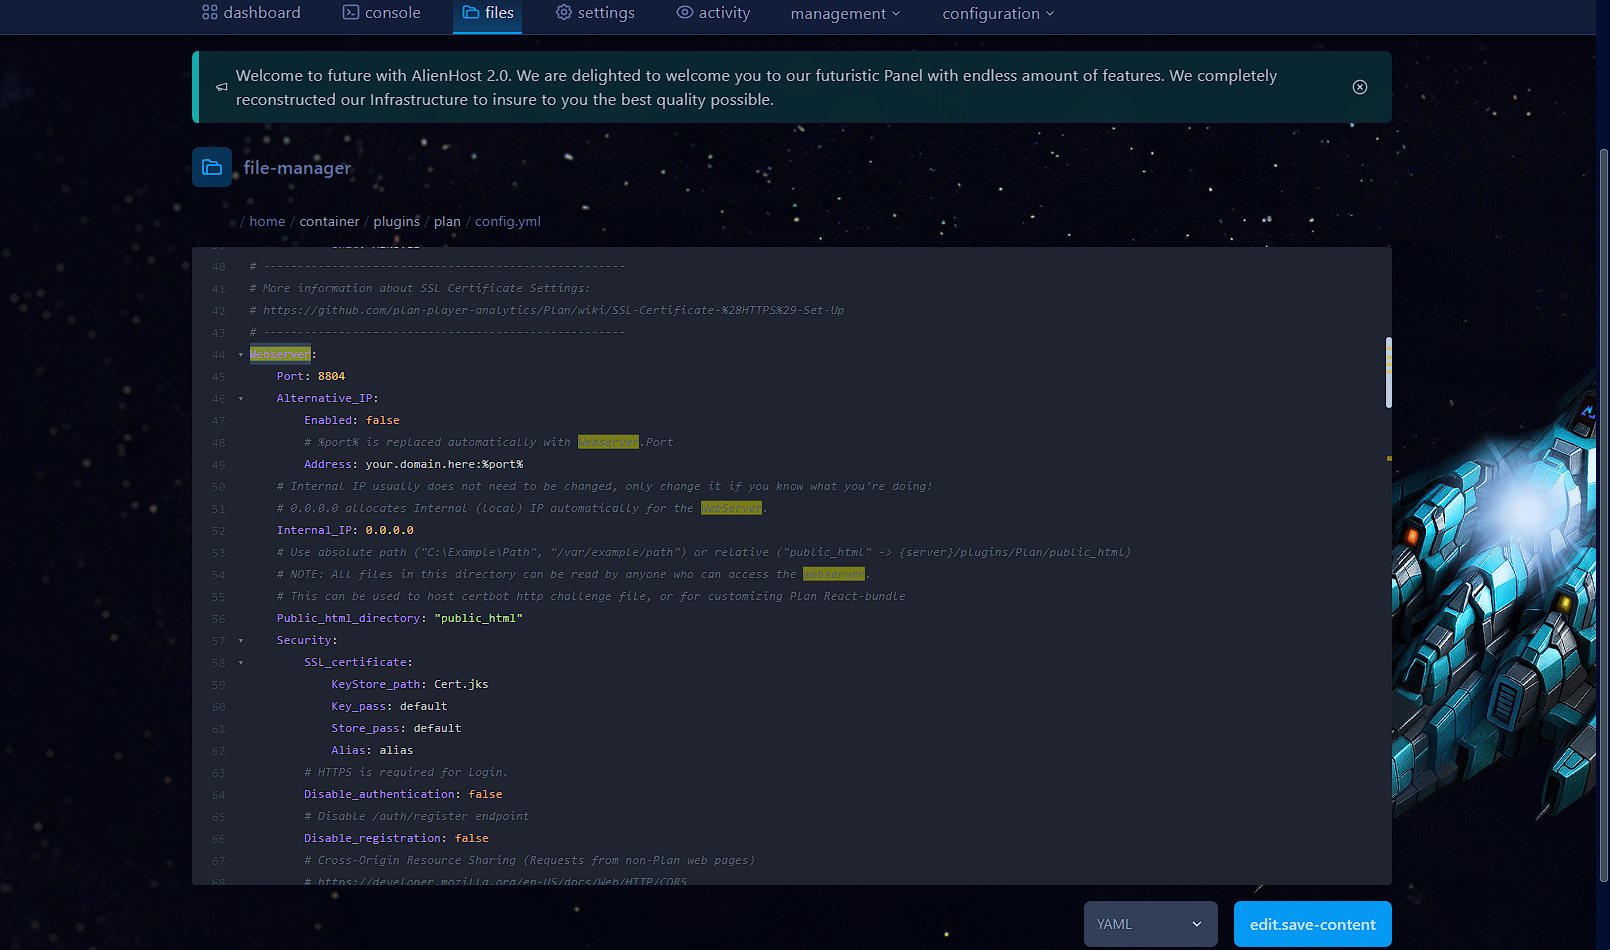
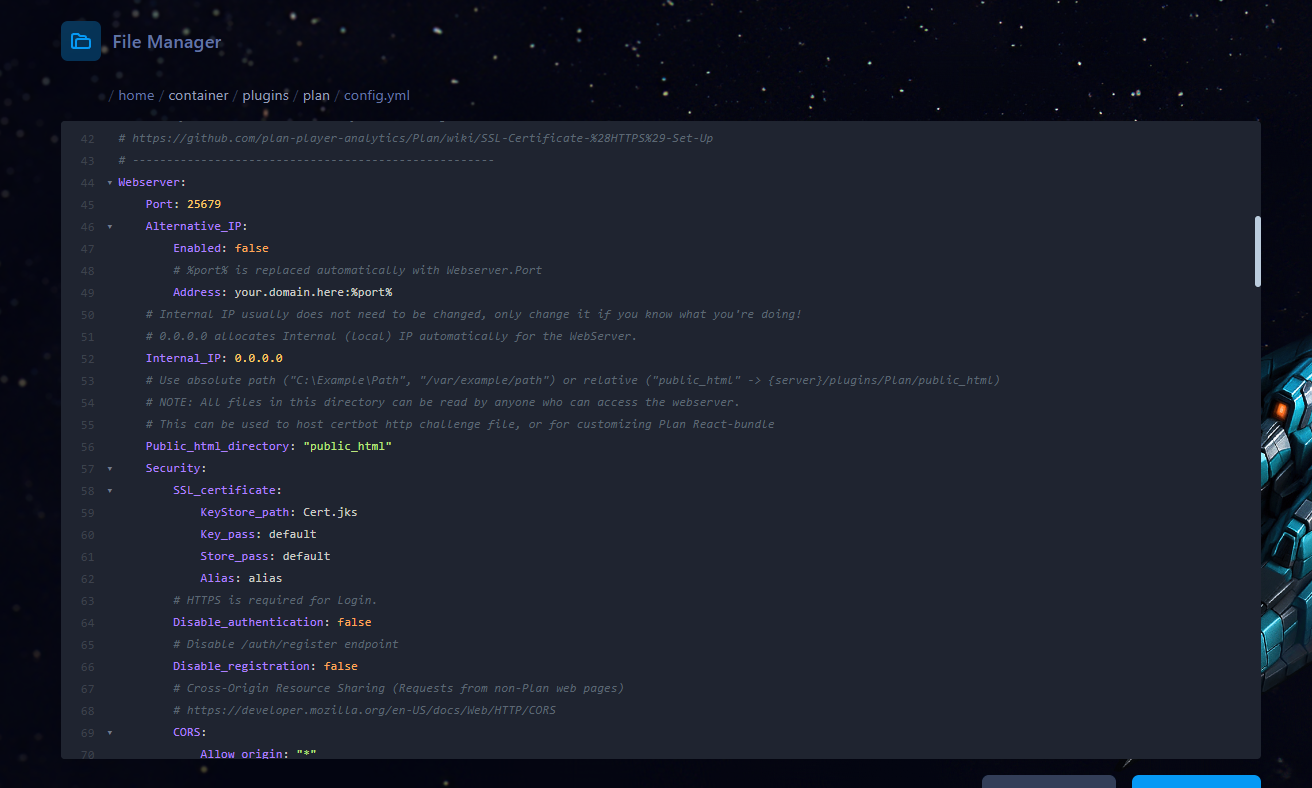
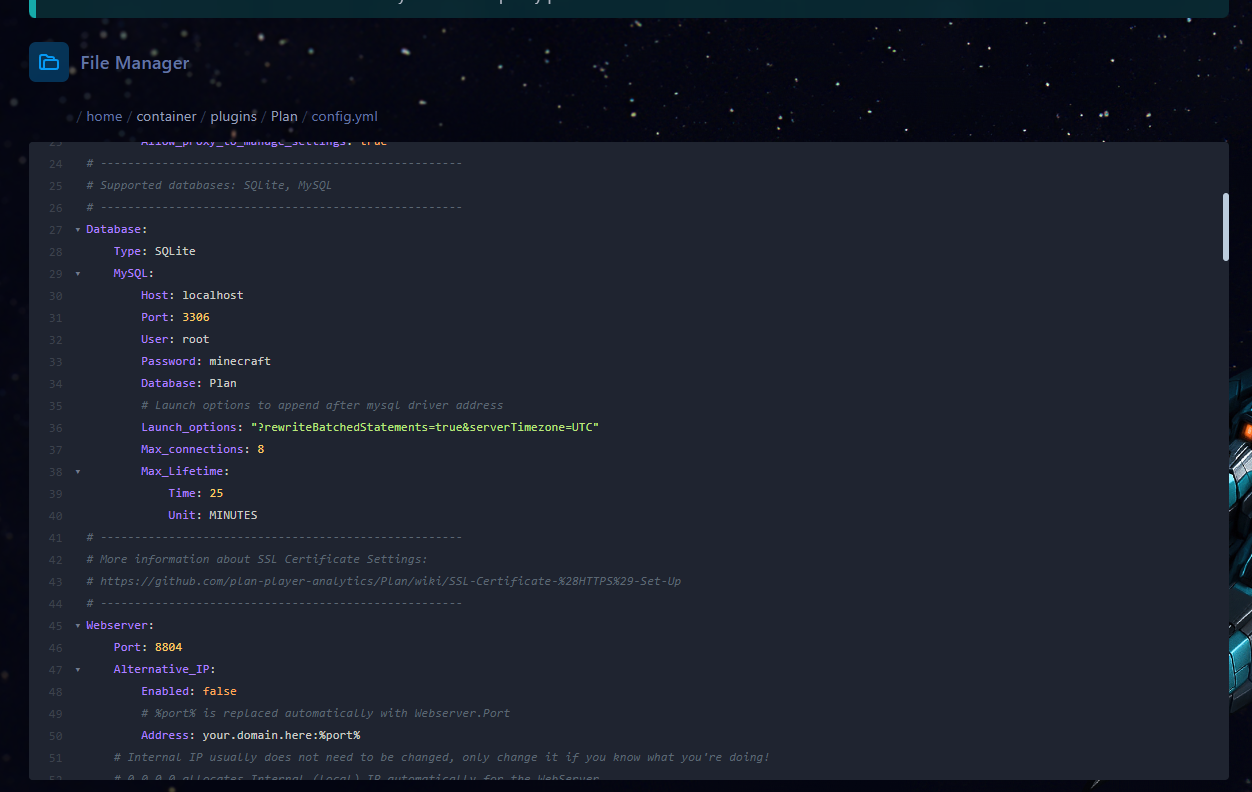
The default port for the webserver set in the config is 8804 (line 44), change it to the one allocated in the requirements section.
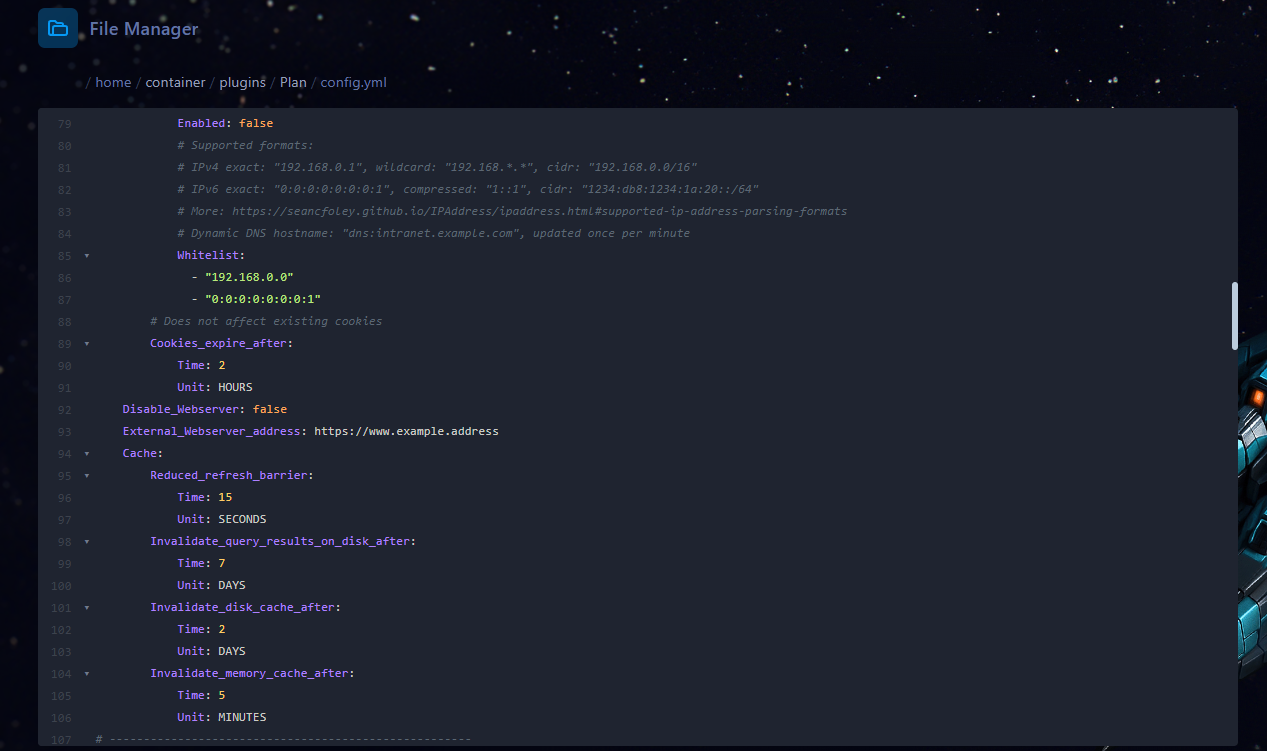
Change the IP Address through Webserver.Alternative_IP field
Restart the server
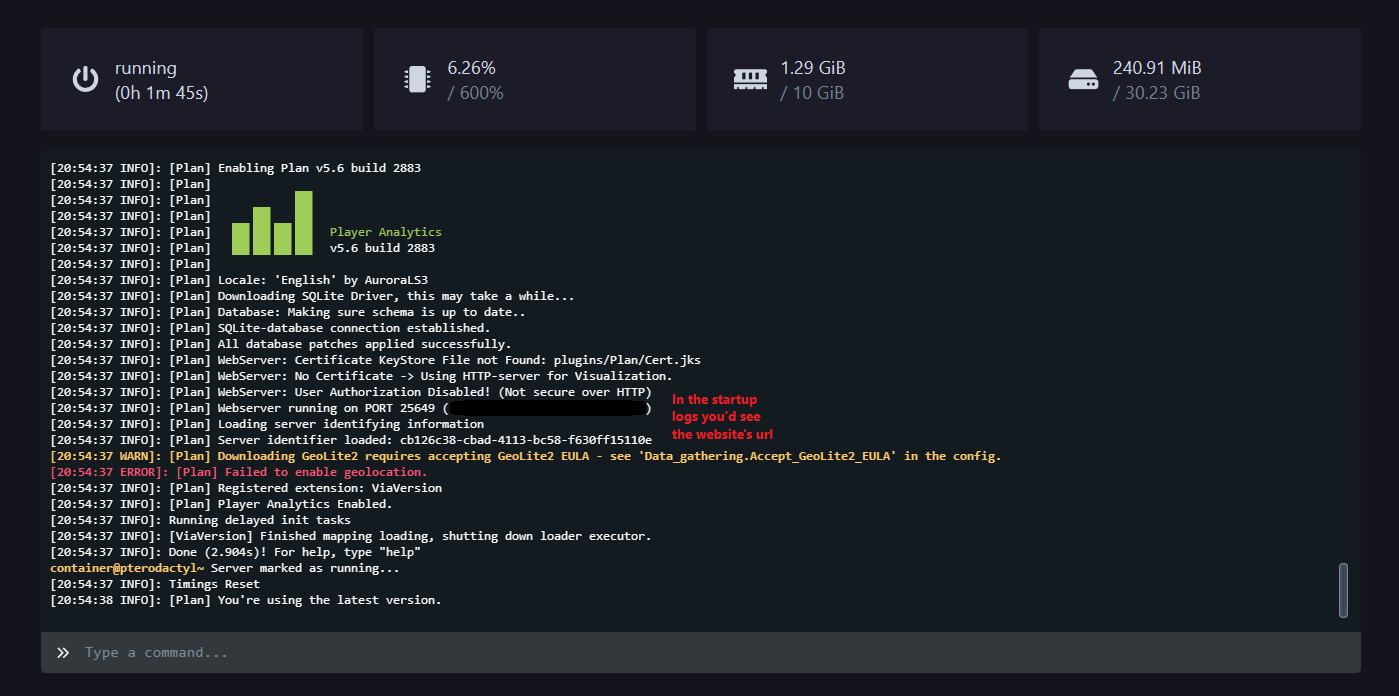
Access The Web Interface
Now go on your web browser and look for http://{yourdomain.com}:{port}
replace {yourdomain.com}:port with your server's actual domain/ip address and port
Plan - Velocity
What is Plan?
Plan is a plugin that provides detailed analytics for Minecraft servers, tracking player activity, server performance, and engagement. It features a web-based dashboard, multi-server support, and integrations with popular plugins. Ideal for monitoring server health, understanding player behavior, and improving retention, it helps server admins make data-driven decisions.
Requirements
Additional port (or network allocation)
Java 11+
MySQL database
Installation On Proxy
Download Plan
Place Plan.jar to the plugin directory through the file manager
Default Webserver Port in the config is 8804, change it to the one allocated.
Change the IP Address through Webserver.Alternative_IP field (don't remove %port% as it automatically hooks to the chosen port).
Set Webserver.Alternative_IP.Enabled to true
Set Server.IP to a domain (e.g. alienhost.net) which is actively pointing at your minecraft server (through the use of DNS records)
Edit Database.MYSQL fileds appropriately (Host, Port, User, Password are required fields).

Installation On Backends
Place Plan.jar to the plugin directory through the file manager
Edit Database.MYSQL fields and Database.Type appropriately. Note: They must be the same as the proxy's
Database.Type should be set to MySQL.

Set Disable_Webserver to true.
Restart the server or reload the plugin.
Access The Web Interface
Now go on your web browser and input http://{yourdomain.com}:{port}
replace {yourdomain.com}:port with your server's actual domain/ip address and port
Dynmap
Installation and usage
Prerequisites
Spigot/Paper 1.10.2+ (This guide makes use of 1.19.4)
Java 11+ (This guide makes use of Java 17+)

Additional port allocation (In this guide the port is 25663)
Free storage (a lot)
Installation
Download dynmap
Upload it in the plugins folder, from the File Manager.
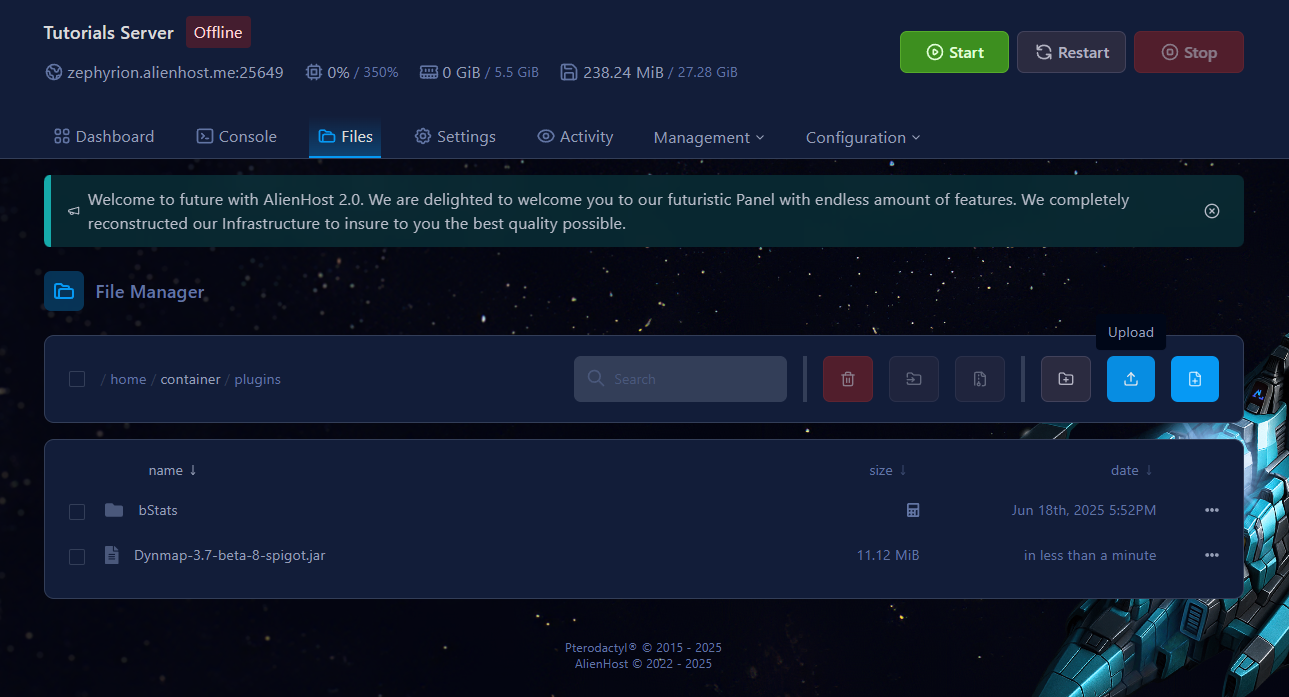
(Re)start the server to load the plugin. You'll know it loaded successfully if it generated a folder named "dynmap"
Web Server
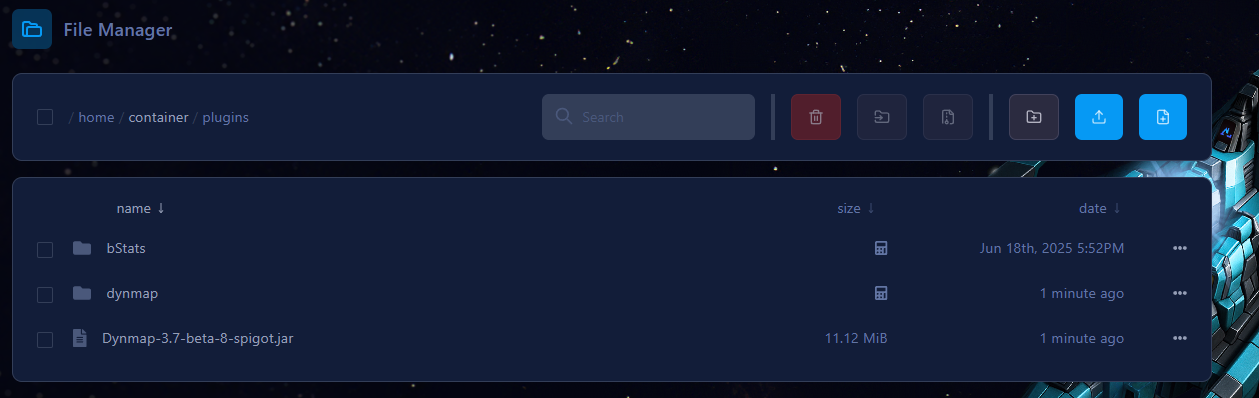
In the Configuration.txt, located at plugins/dynmap/Configuration.txt:
Find (use CTRL + F shortcut) webserver-port field within the file.
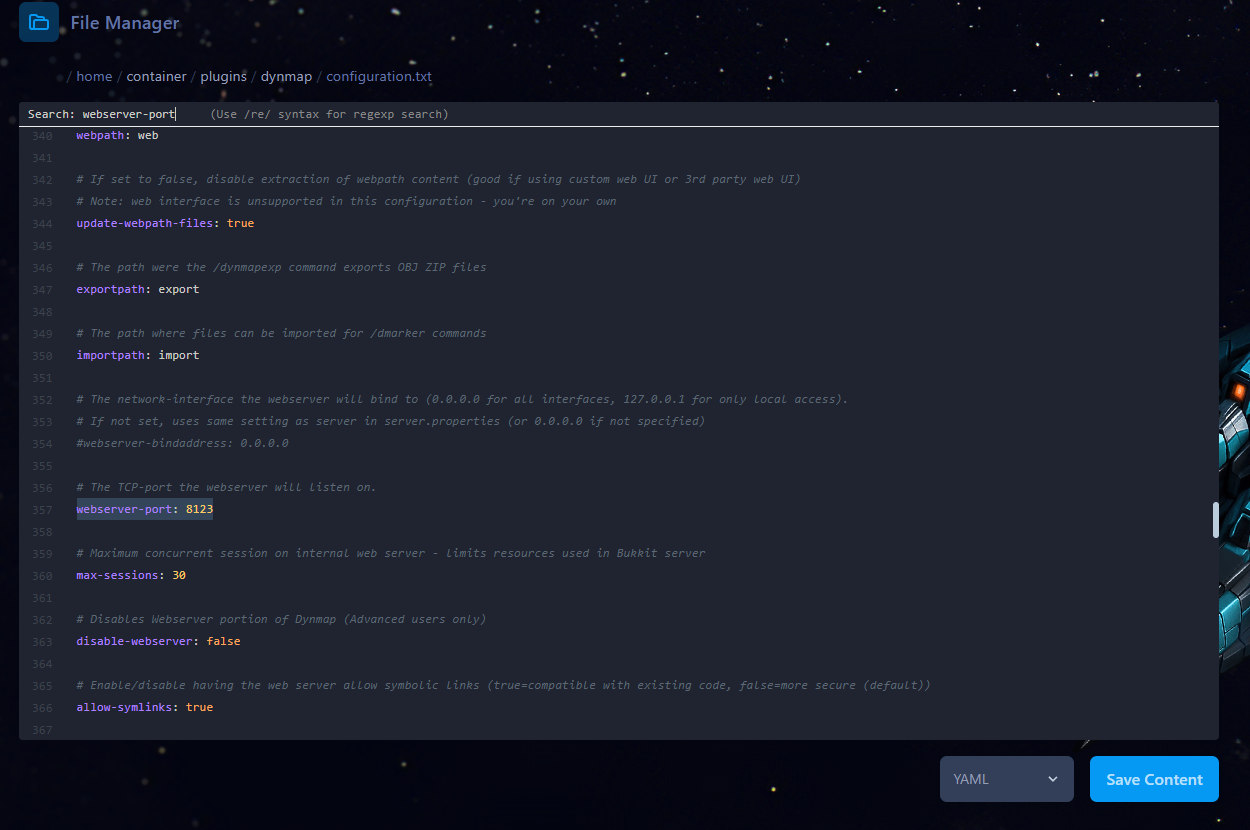
Change the port's value to your additional port allocation's value.

Restart the server to apply the changes
Changing Storage Type (Optimization)
What is this chapter about?
In this chapter I'll help you optimize Dynmap. The default configuration is not the best, it can be improved and that's what we are doing.
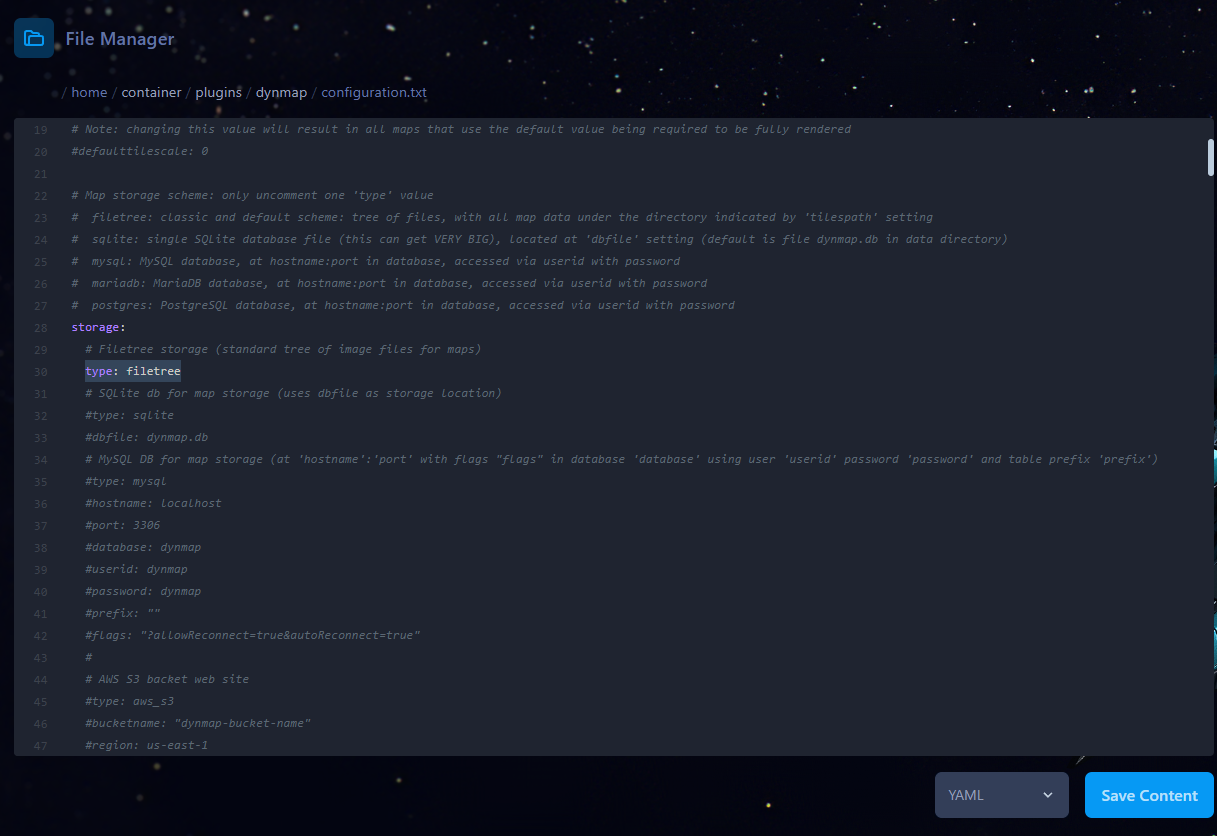
Changing Storage Provider
By default the storage type is set to filetree (As shown by the following image).
The configuration is located at plugins/dynmap/configuration.txt.

SQLite
We would suggest you to switch over to SQLite if you were using the default filetree storage.
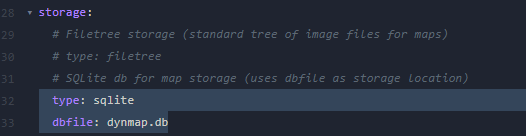
- Change
typeto sqlite (case non-sensitive) - Make sure
typeanddbfileare the only enabled settings (to comment lines out, put a#in front of the line. dbfileallows you to customize the database's name. Doesn't have any performance impact. The file's extension must be.db.- When using Fabric/Forge you'll need to make use of Kosmolot's SQLite mod.
MySQL
Another option is MySQL we don't really suggest you to use this for DynMap due to network latency and other external factors
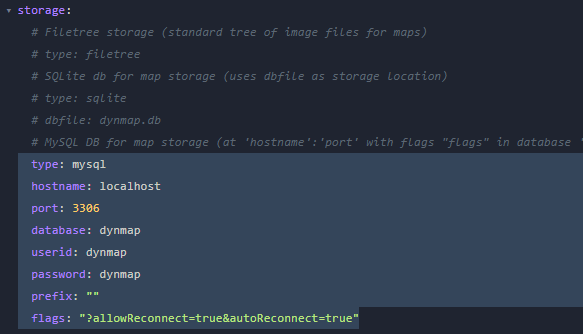
- Change
typeto mysql (case non-sensitive) - Change the other highlighted values to the ones generated. Refer to this guide.
- Now save the file and restart the server to have the new storage type applied.
Changing the resolution of the map (Optimization)
Possible values |
Description |
vlowres |
Uses the HDMap renderer with view from the SE with the "vlowres" resolution (2 pixels per block edge) |
lowres |
Uses the HDMap renderer with view from the SE with the "lowres" resolution (4 pixels per block edge) |
hires |
Uses the HDMap renderer with view from the SE with the "hires" resolution (16 pixels per block edge) |
low_boost_hi |
Uses the HDMap renderer with view from the SE with the "lowres" resolution (4 pixels per block edge), with boosted tiles rendered at "hires" (16 pixels per block edge) |
hi_boost_vhi |
Uses the HDMap renderer with view from the SE with the "hires" resolution (16 pixels per block edge), with resolution boosted tiles rendered at 'vhires' resolution (32 pixels perblock edge) |
hi_boost_xhi |
Uses the HDMap renderer with view from the SE with the "hires" resolution (16 pixels per block edge), with resolution boosted tiles rendered at 'xhires' resolution (64 pixels perblock edge) |
Brief Explanation
These values allow you to either save storage (vlowres saves the most) or have a high quality map (hi_boost_xhi provides the best quality/resolution for the map).
Which option should I choose?
The default value is hires. That probably works for most server owners. But for those who lack storage, they may be prompted to pick a "storafe saver" option such as vlowres or lowres.
Additionally High Resolution maps take a lot of time to render (and an exhorbitant amount of storage).
Where and how to change the resolution
Through the use of the File Manager, reach the following path: /home/container/plugins/dynmap (NOTE: This is the path for Spigot/Paper servers. These are all folders), where you'll find a text file named configuration.txt. Open it.
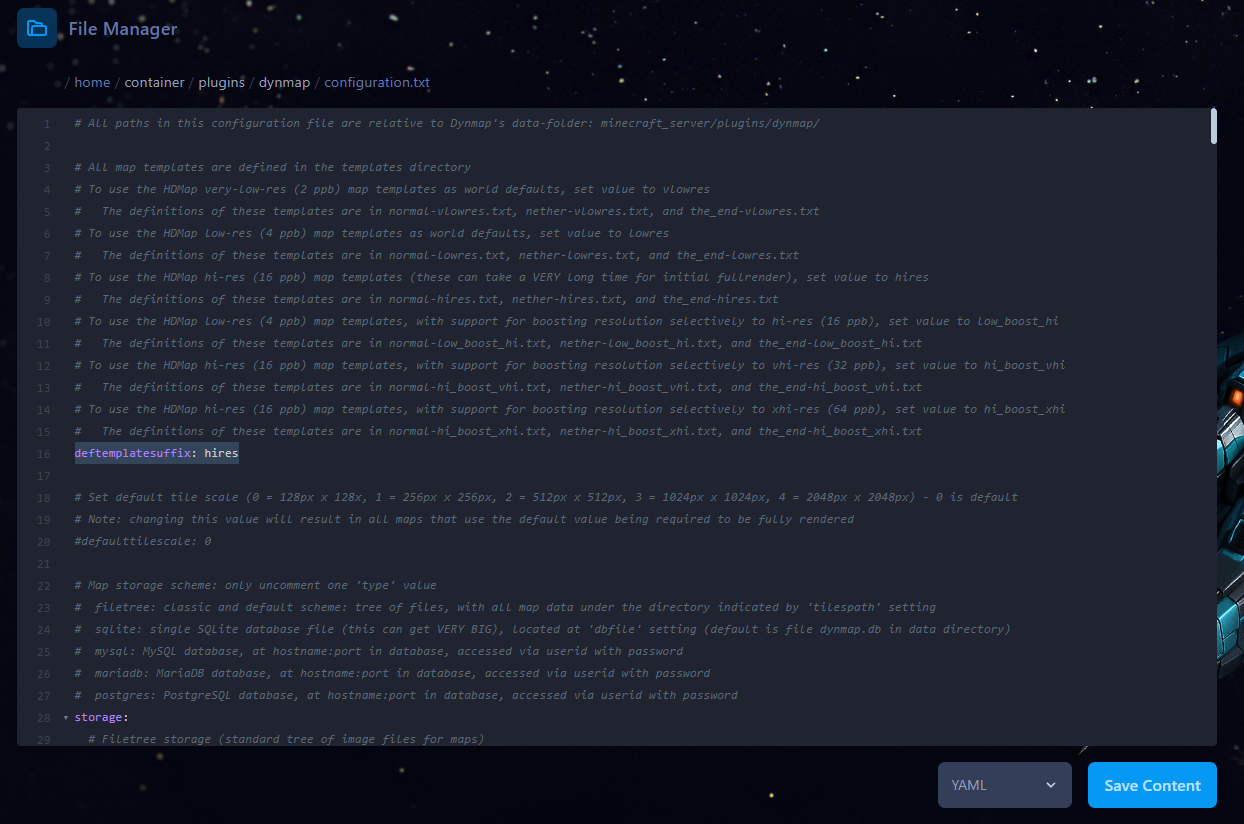
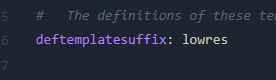
Now change deftemplatesuffix with one of the values given at the beggining of this article. Save the file with the Save content button and restart the server through the console.
Examples
Very Low Resolution:

Low Resolution:
Client
Minecraft Client/Launcher related guides.
How to obtain your minecraft client's logs
Guide: How to Pull Your Minecraft Client Logs
This guide will show you how to find and share your Minecraft logs using the default launcher on Windows.
Finding Your Minecraft Logs
For the Default Minecraft Launcher (Vanilla)
Windows
-
Press
Win + R, type%appdata%\.minecraft\logs, and pressEnter. -
Locate the log file:
-
Latest Log:
latest.log(for your most recent session).
-
-
Open the file using Notepad or any text editor.
How to Share Your Logs
If you need help diagnosing issues, you can upload logs using:
Always remove sensitive information like your IP address before sharing logs publicly.